

Integer Chips
ALEKS is an adaptive online learning program for Math and Chemistry. One of its competitive advantages is a diverse array of digital learning tools. Adopting California's new math framework, ALEKS is incorporating new tools, one of which is Integer Chips.
Because these tools are required to be fully accessible, the primary challenge lies in crafting a highly interactive tool that remains inclusive for those with disabilities or restricted technological access.
Project Duration & Type
1 Month, Company project
My Contributions
Interaction, UI, Accessibility
Team
1 Sprint Team, PMs, Math Education Specialists, Accessibility Specialists, Business Stakeholders
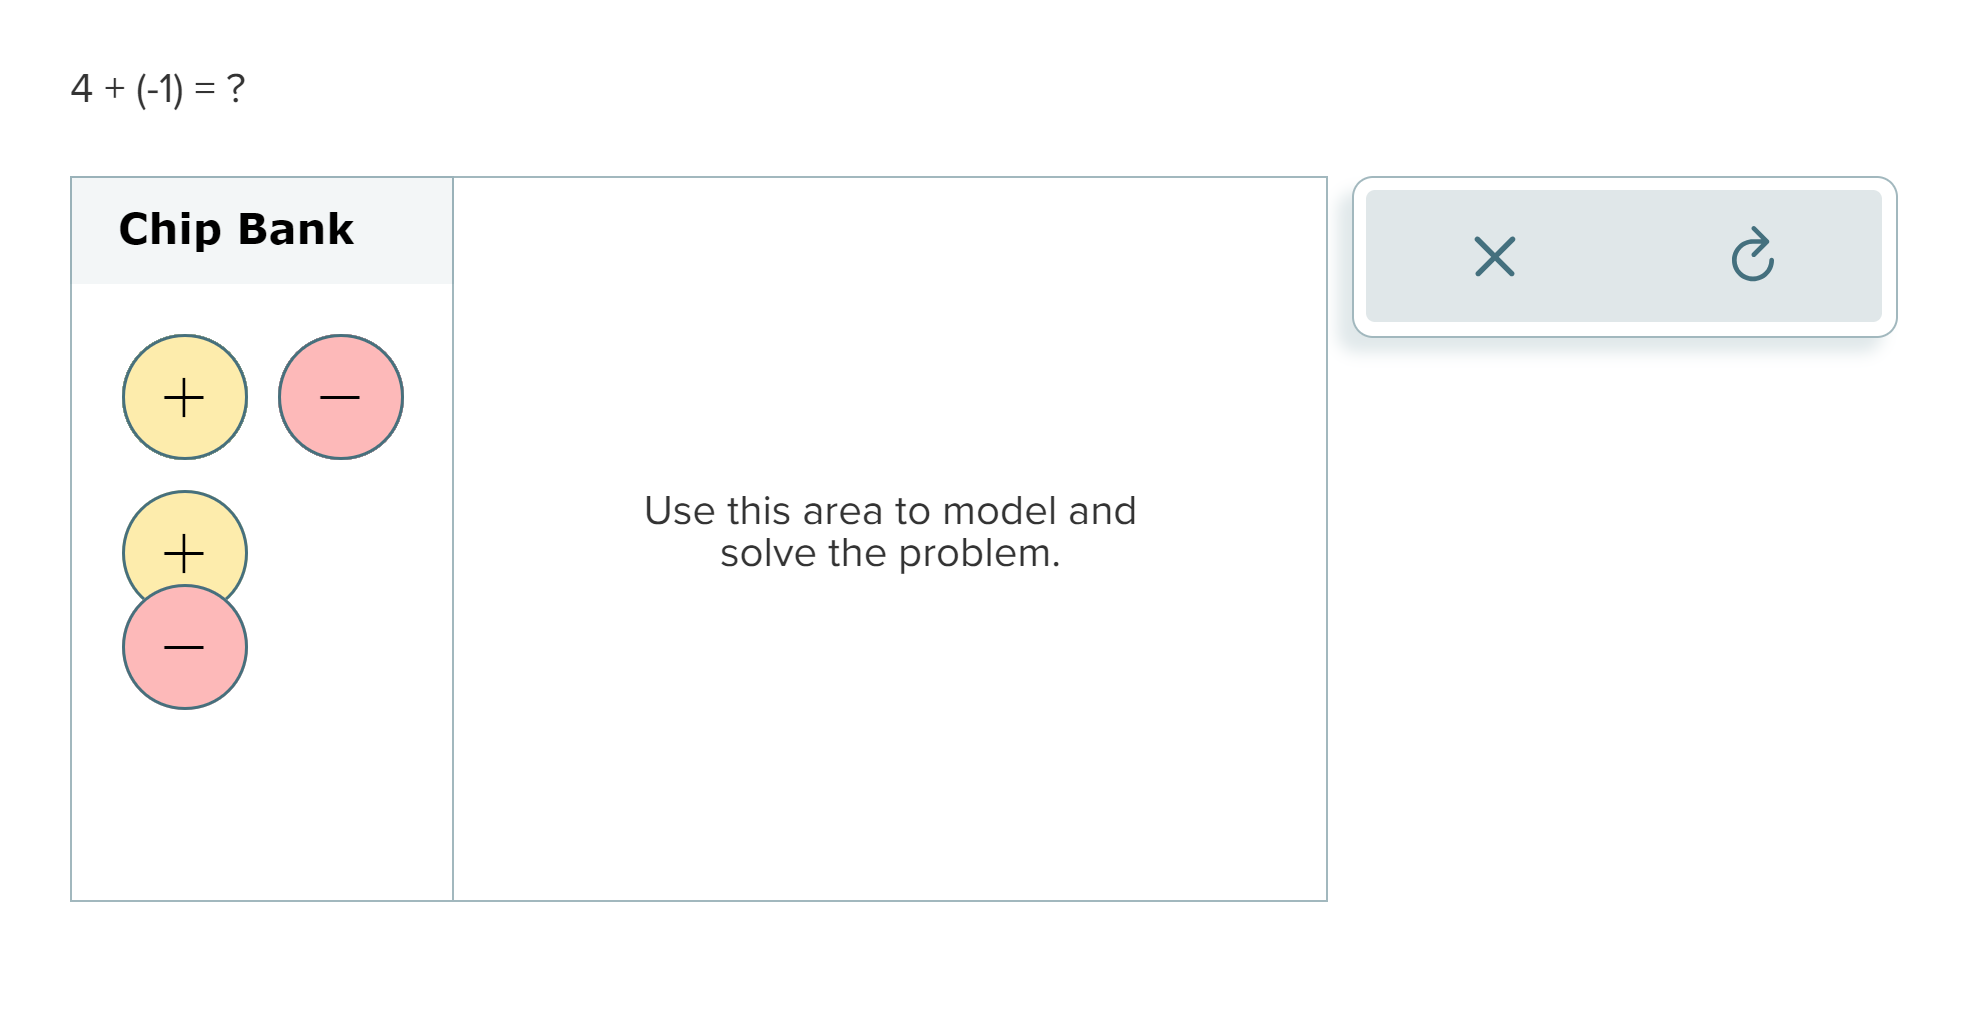
Integer Chips? What is it?
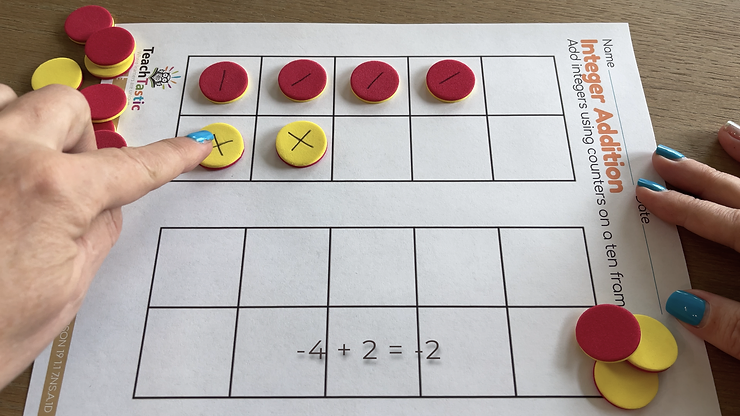
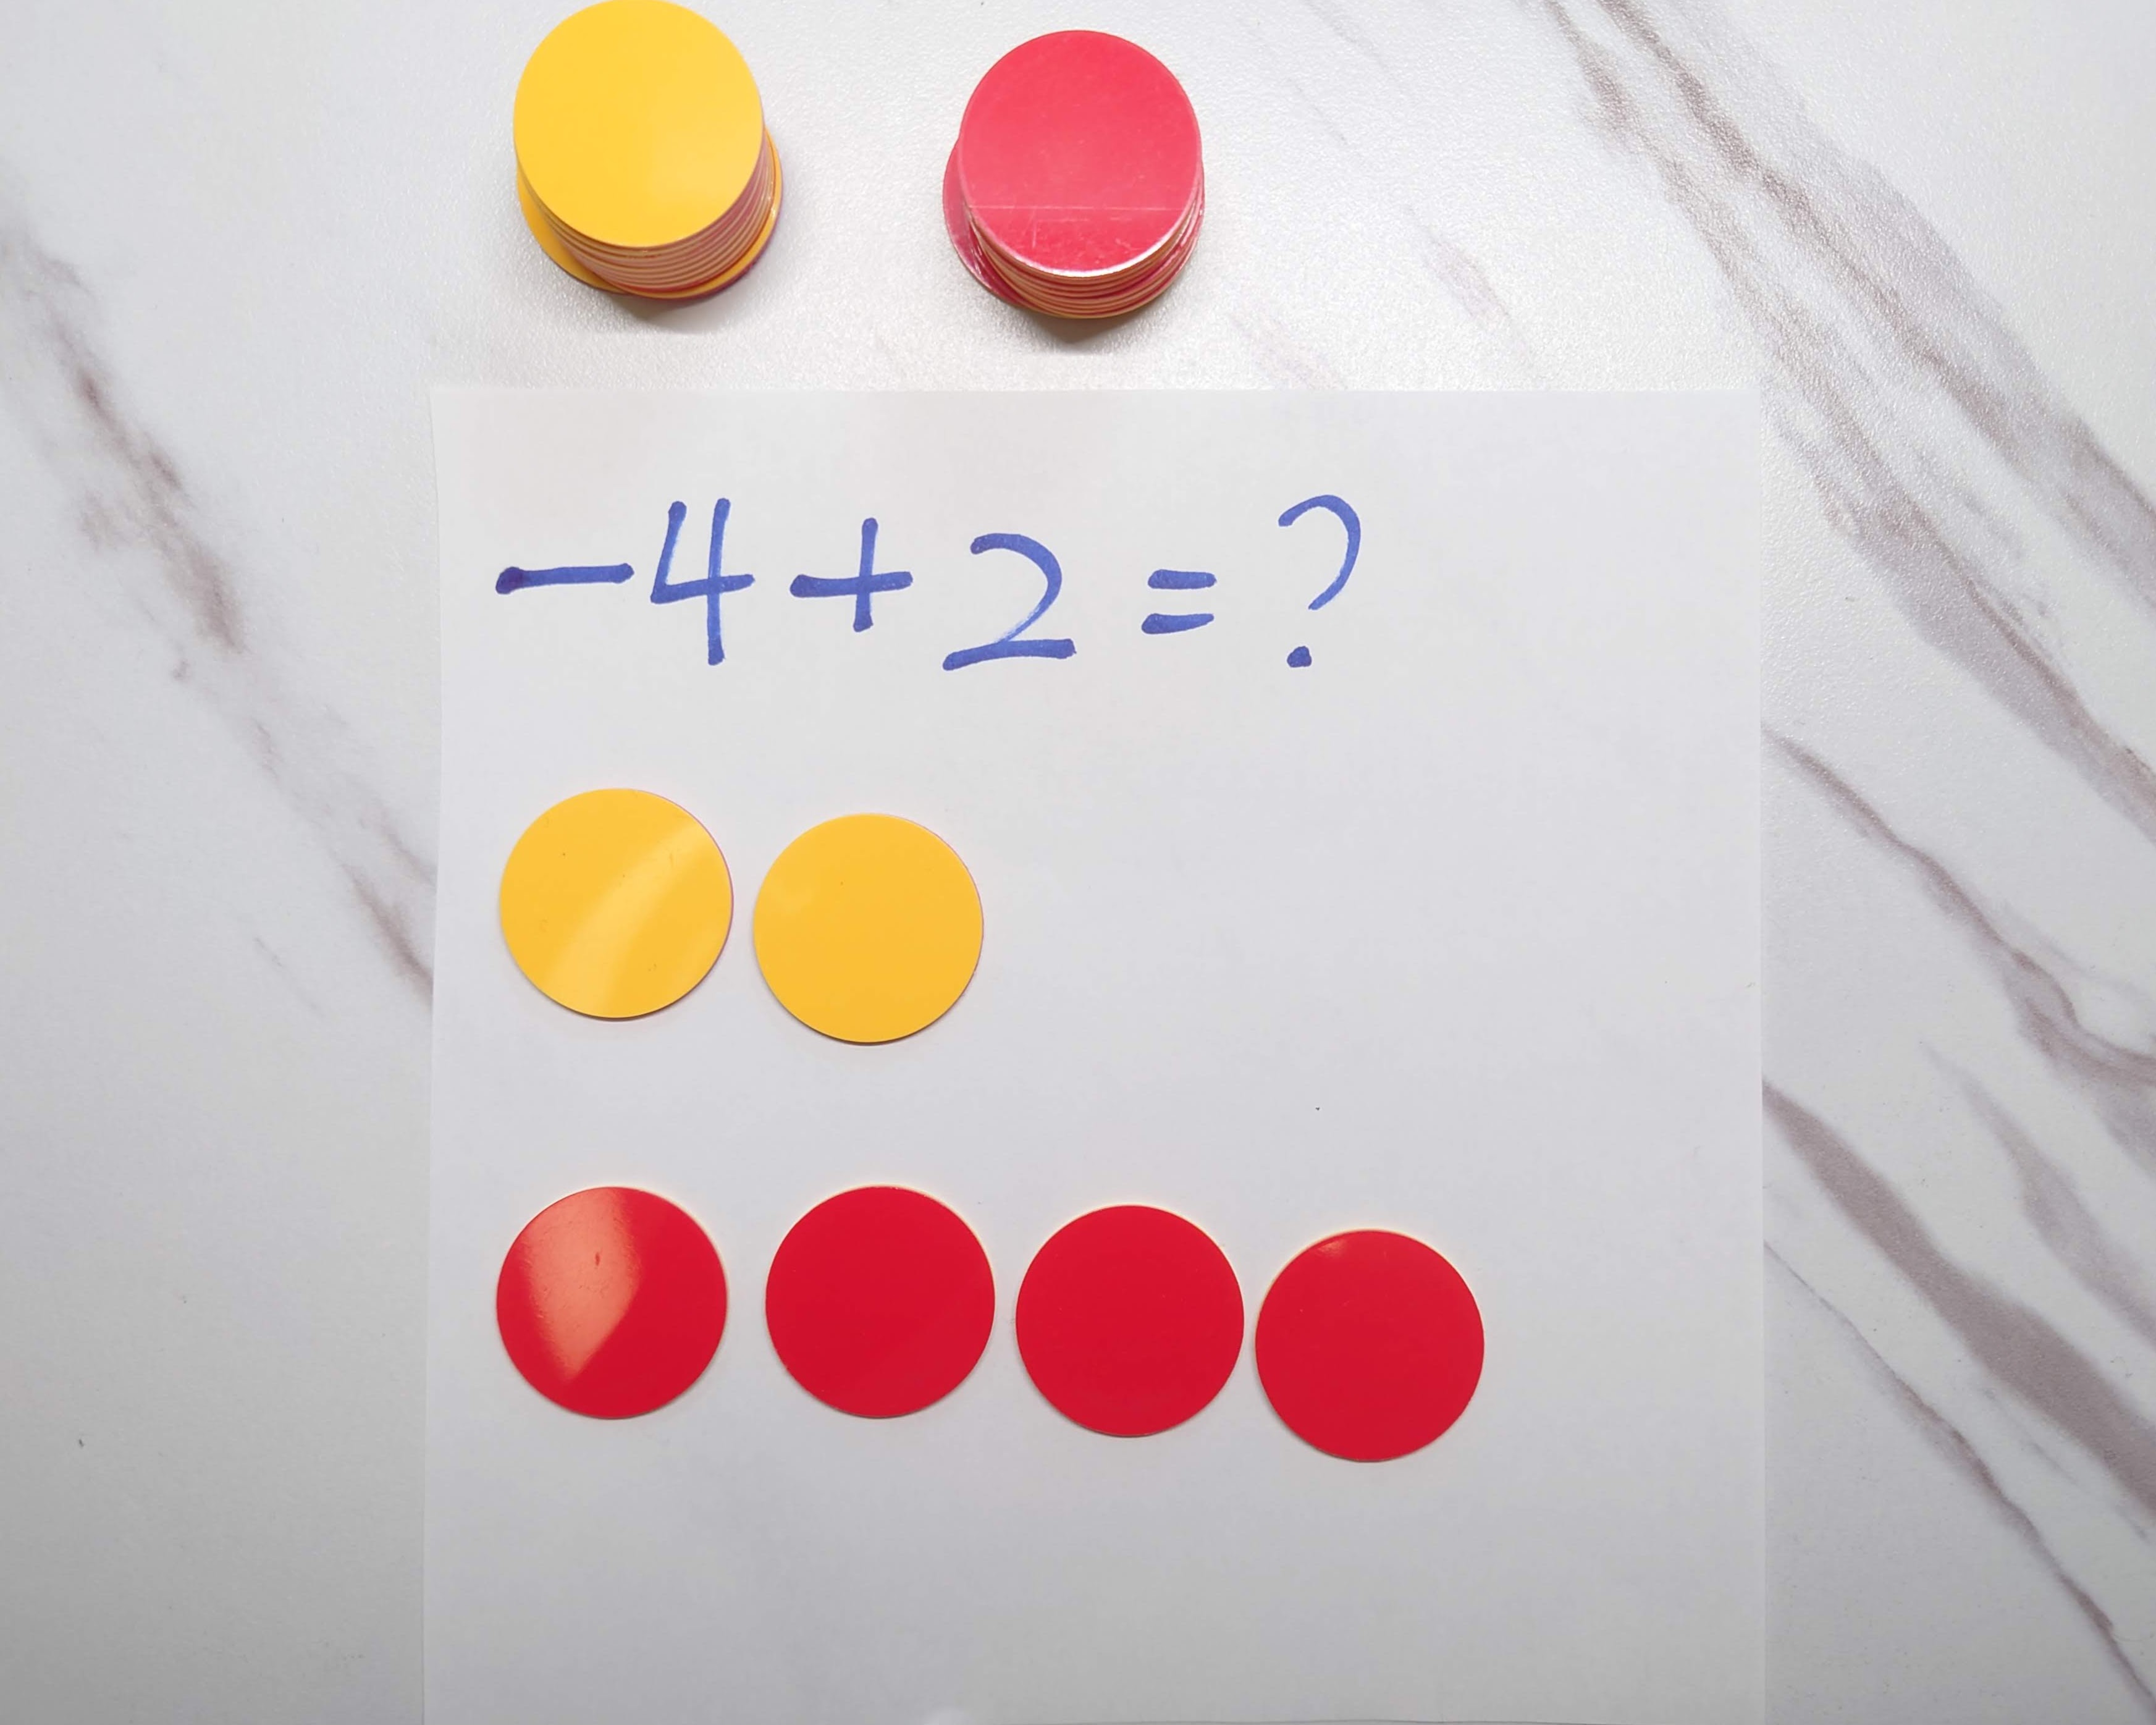
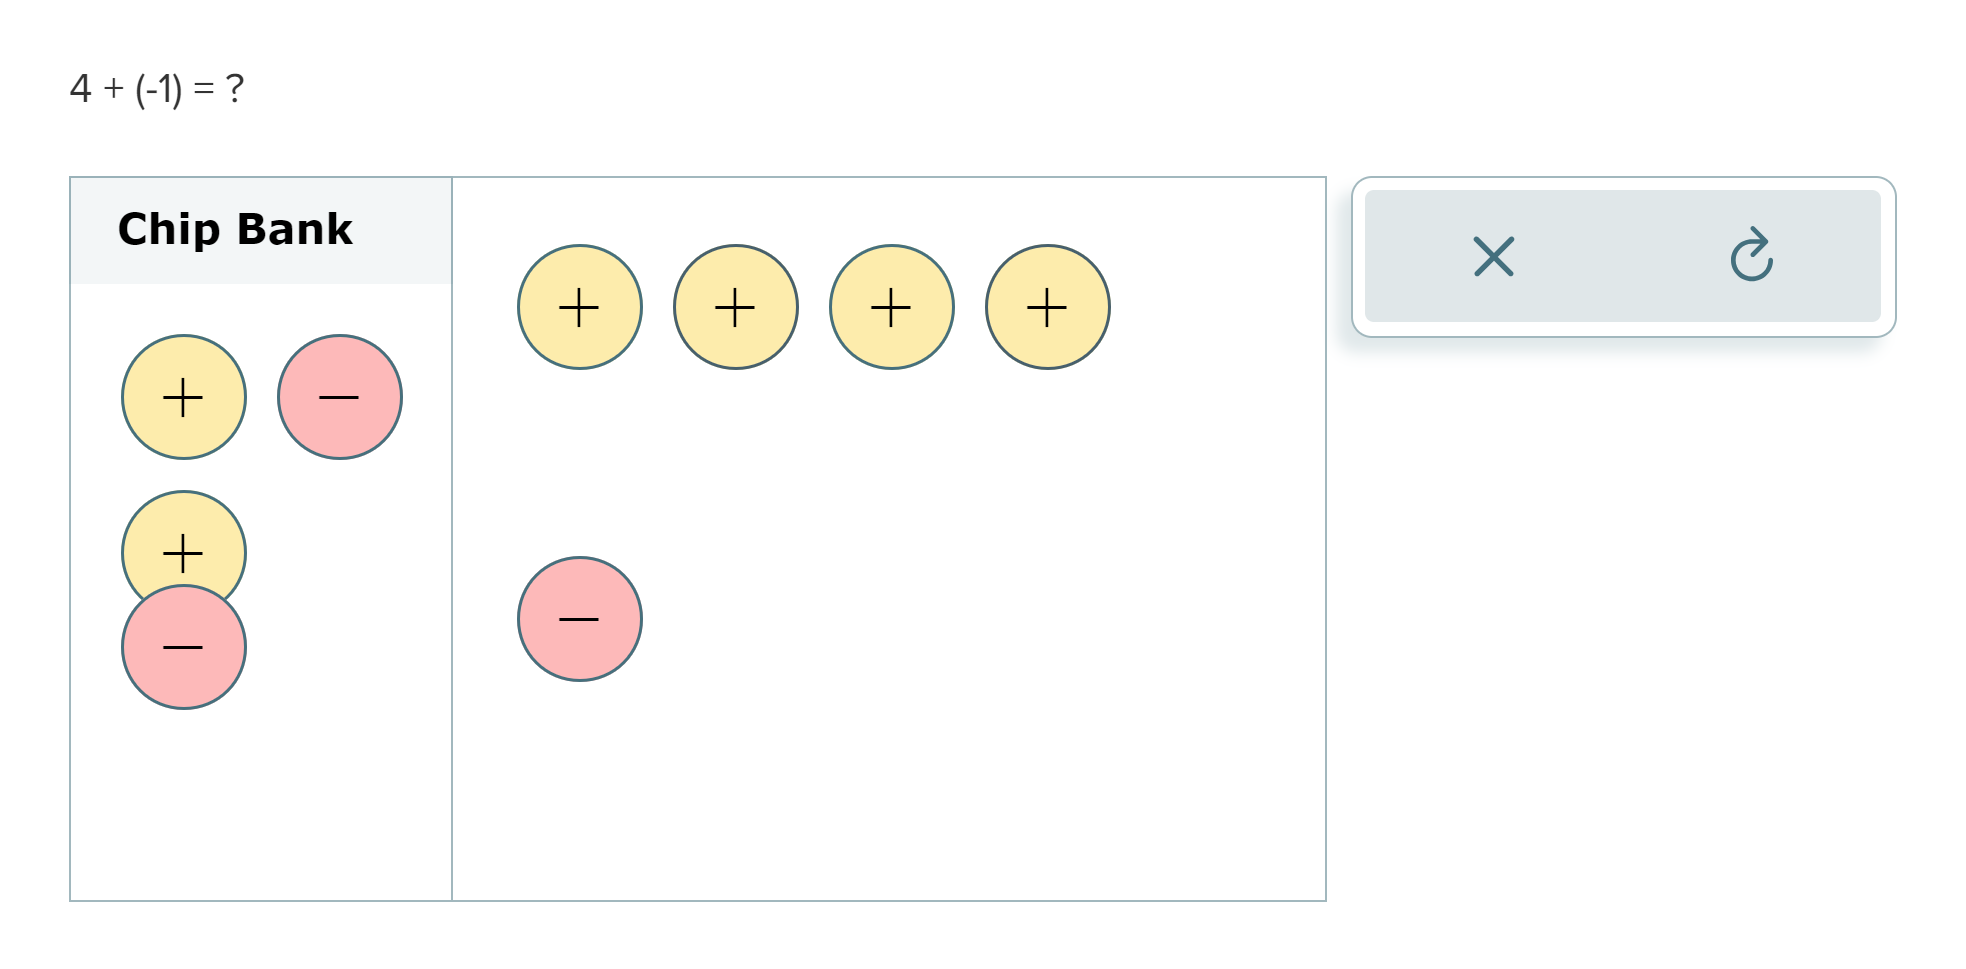
Integer Chips is a physical manipulative commonly used by grade 6-9 math teachers to aid students in understanding addition or subtraction with positive and negative integers. By manipulating the chips, student are able to model and solve integer arithmetic problems.
How does it work?

Design Goals
1. Mimic Physical Integer Chips
Many students are familiar with the physical manipulative, as it's a common teaching method in school. Thus, the interaction and visual of our digital tool shouldn't deviate from it.
2. Provide Feedback
For learning purposes, the tool should permit rather than stopping errors. However, the tool should also offer feedback or hint to guide students back to the correct path.
3. Be Accessible
This tool must adhere WCAG 2.0 AA standards. I need to consider not only visual elements but also potential interactions via assistive technologies.
Disassembling Integer Chips
I started this project by breaking down Integer Chips into its main elements and key interactions. This practice allowed me to be familiar with the tool and determine what elements I needed to contemplate in the design process.
Main Elements
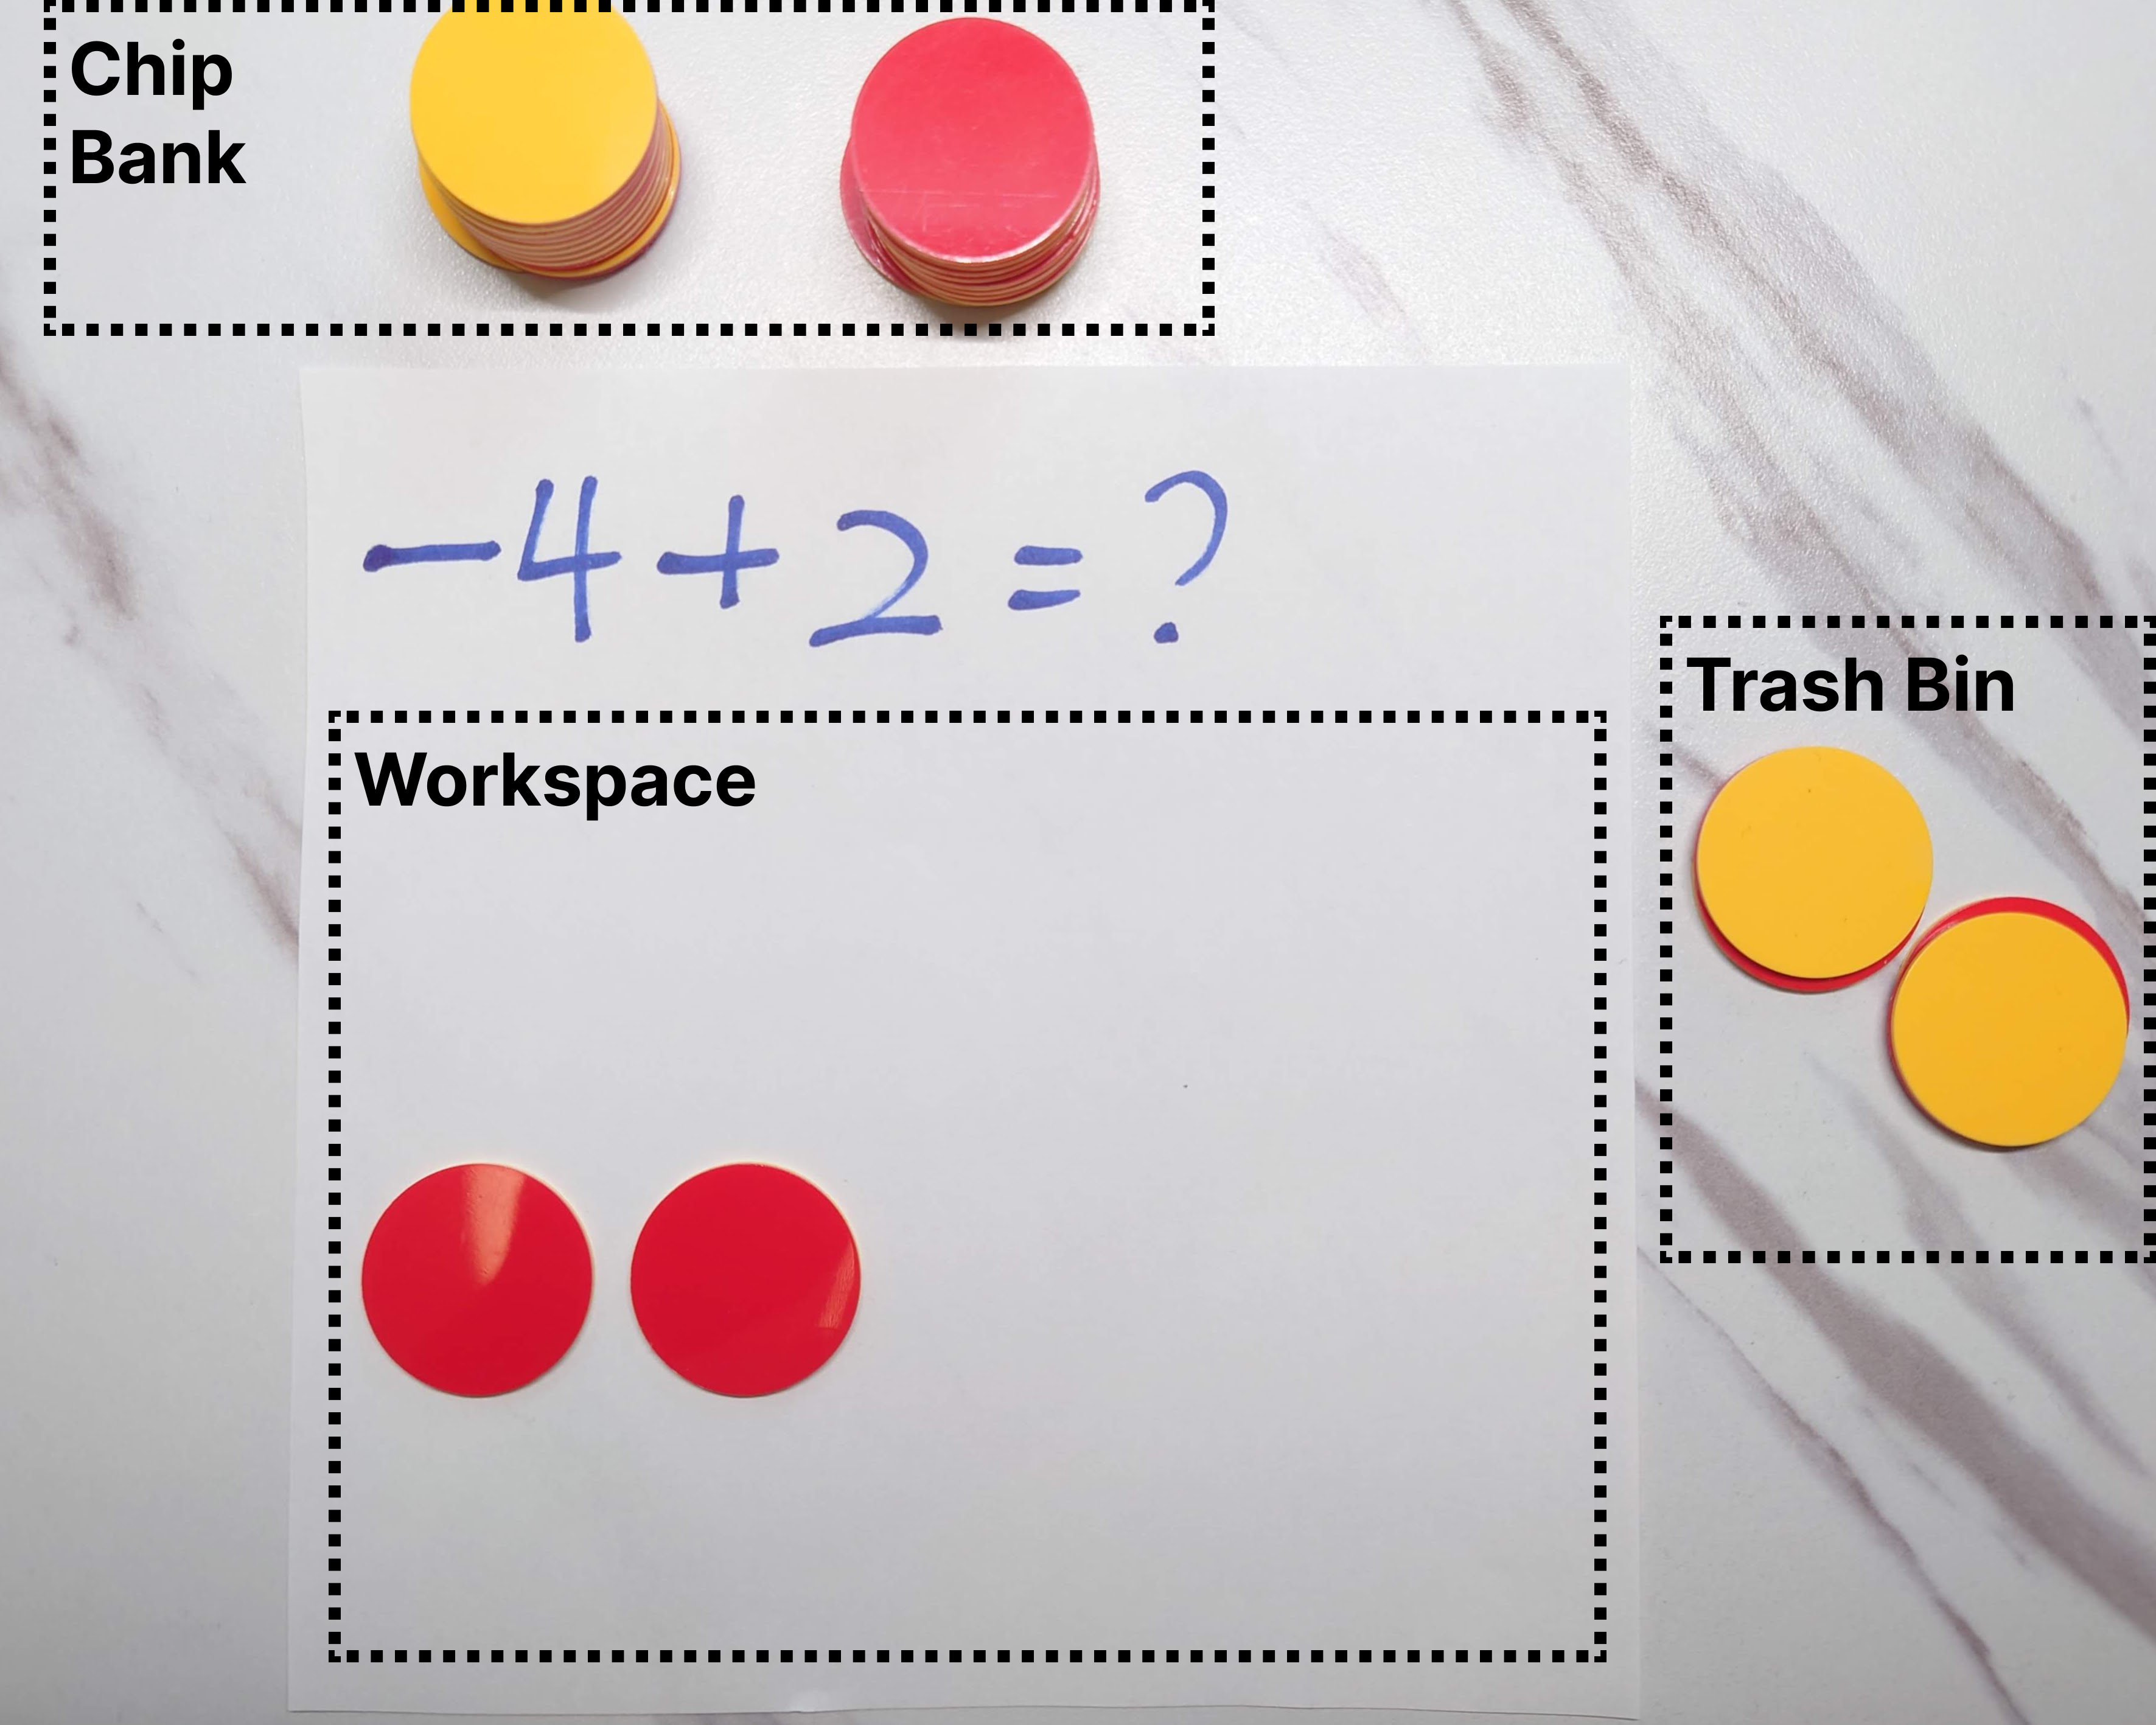
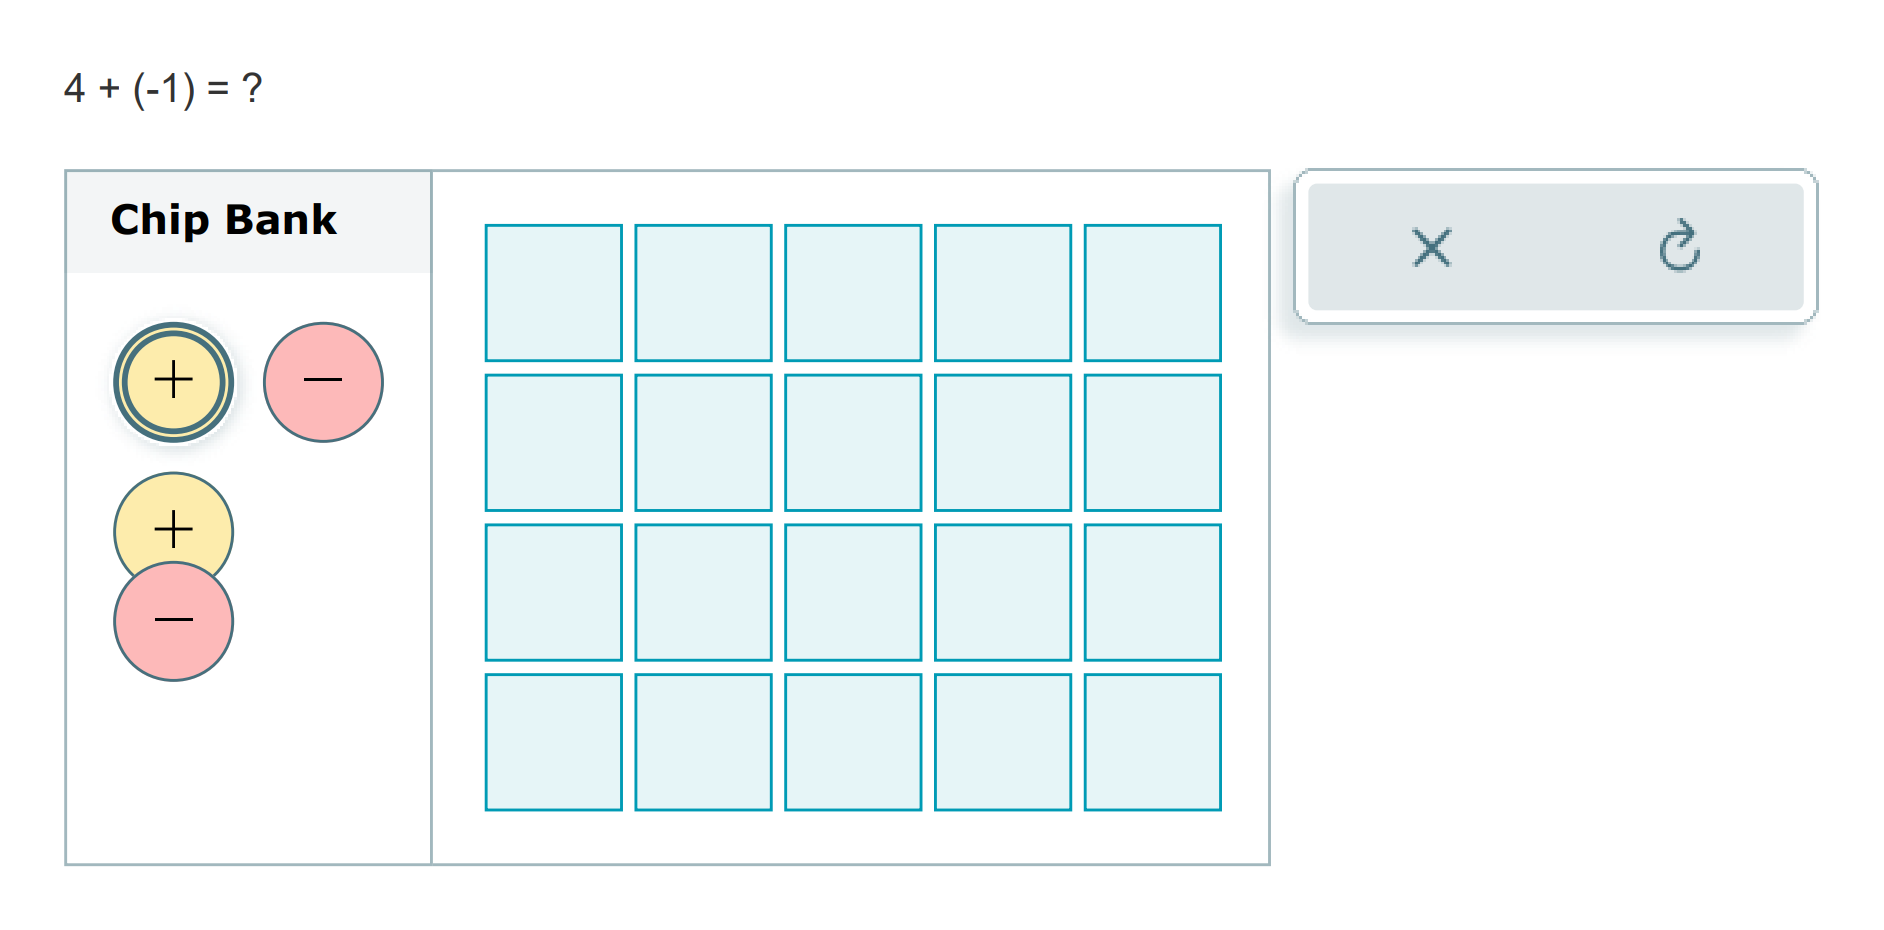
- Positive and Negative Chips
- Chip Bank
- Workspace
- Trash Bin*
- Error Messages
Key Interactions
- Adding Chips to the Workspace
- Removing Chips from the Workspace
- Cancel Zero Pairs
*Trash Bin is mainly used for subtraction problems.
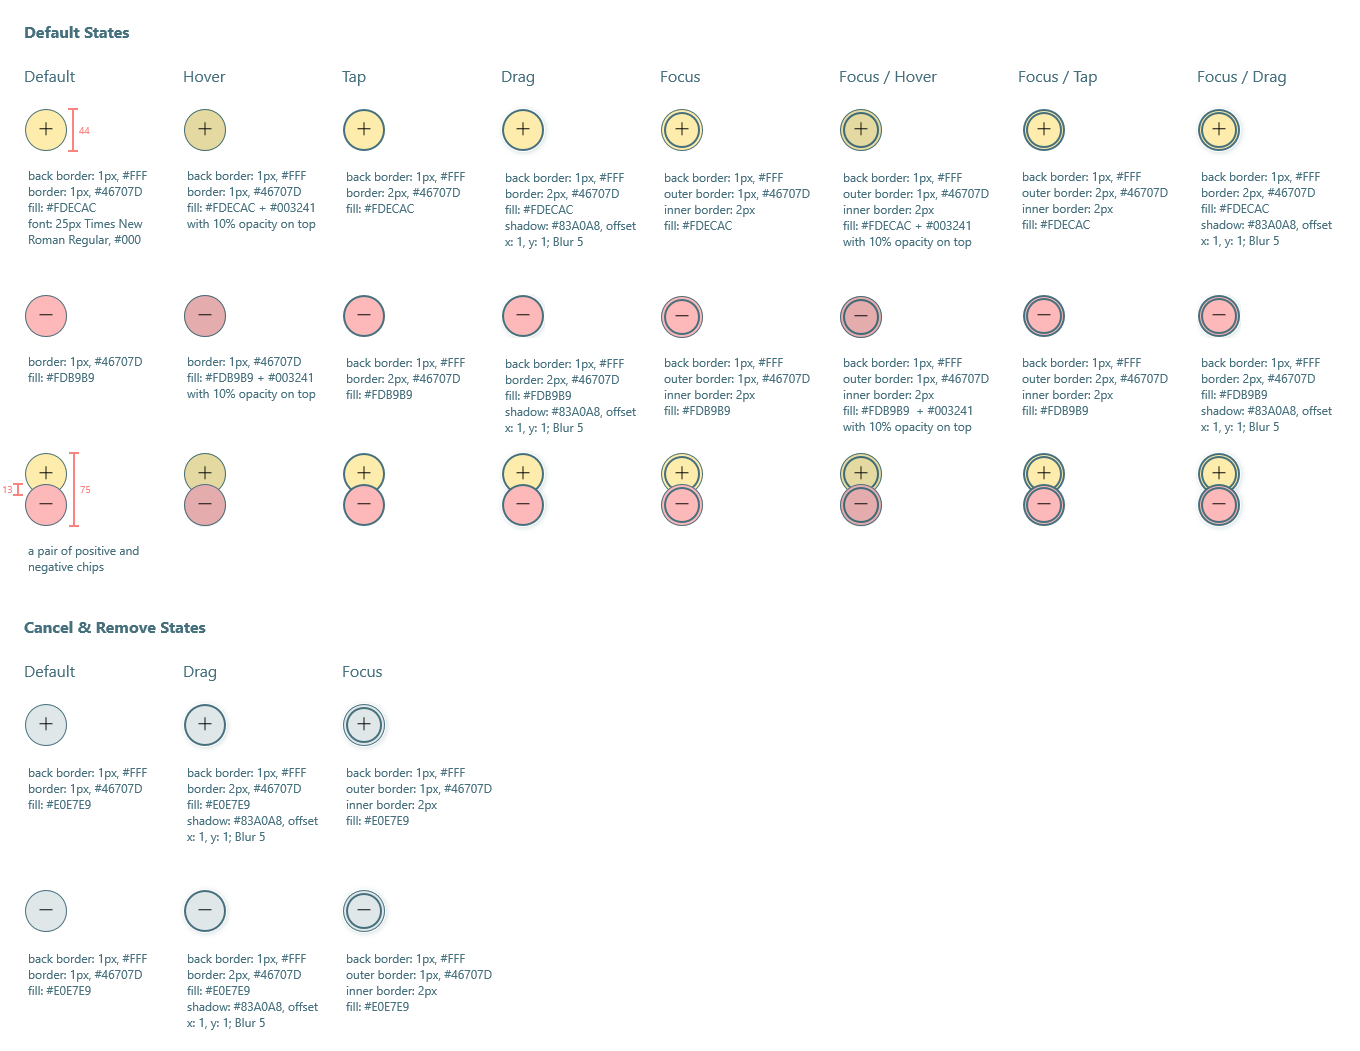
Let's talk about Chip Design.
I made the following key design decisions about chips.
- Colors: To be consistent with the physical tool, positive chips are yellow, and negative chips are red.
- Labels: To account for color blindness, "+" and "–" are labeled.
- Borders: Borders are added to provide extra contrast.
- States: For various interactions, different states are created.
- Shadows: Drag states implemented shadows to create a floating effect.
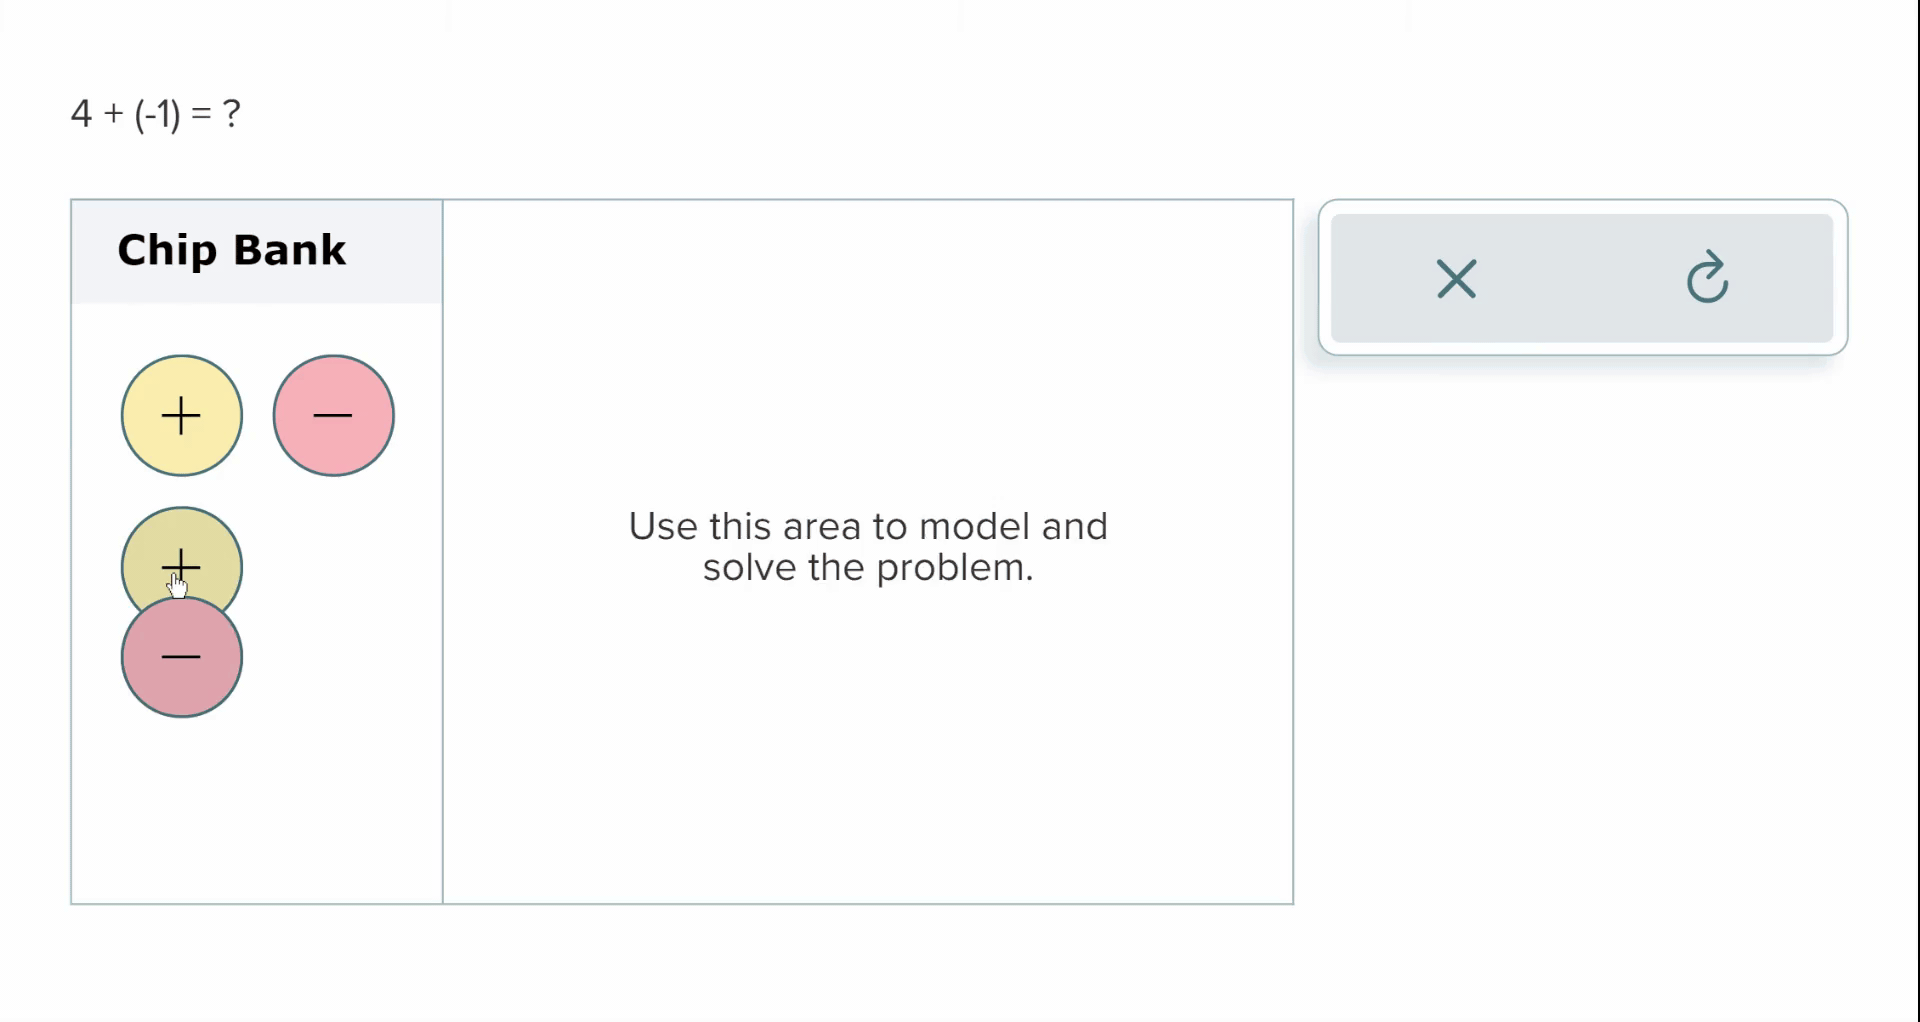
Then, I focused on the workspace.
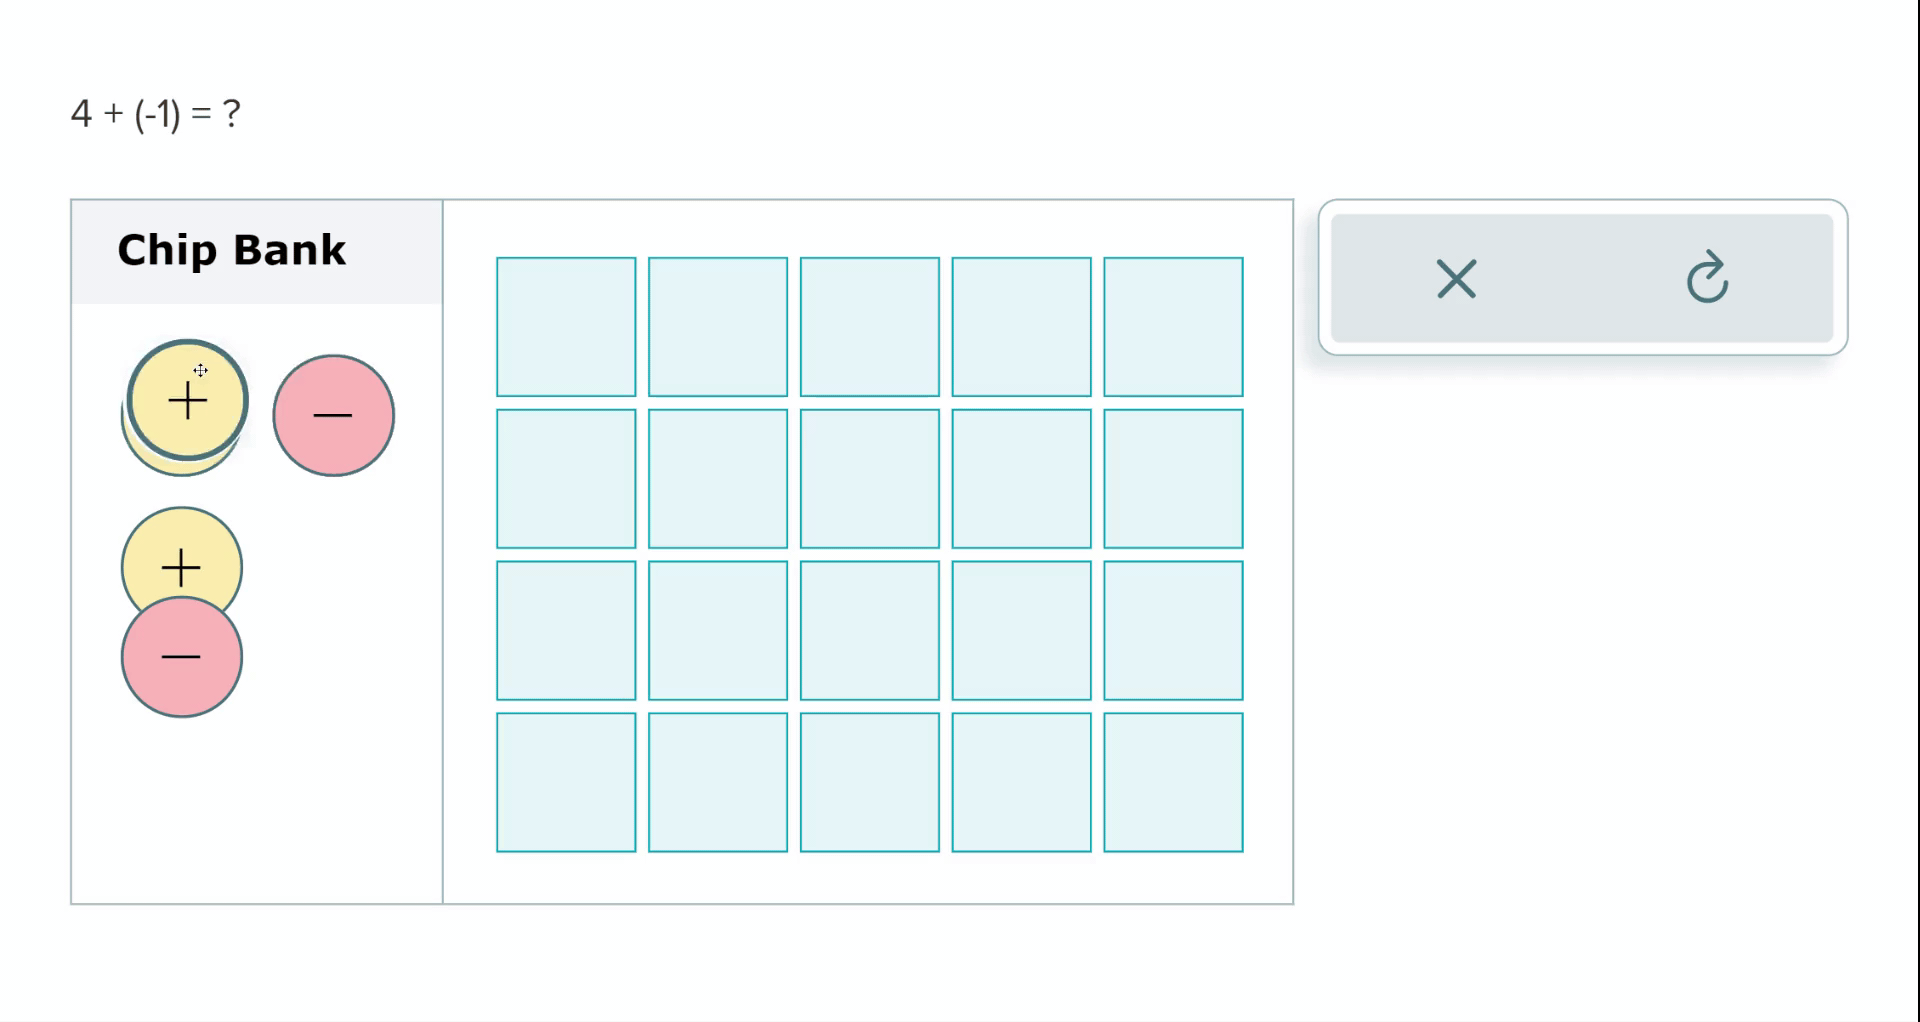
Having a Grid
I had 2 distinct designs for the workspace: setting a grid structure or providing students with a freeform space. After discussing with the team, I chose the grid-based approach.
- Grid puts less burden on developers.
- Grid is much easier for students to interact.
- Grid allows us to set a limit of only 20 chips in the workspace.
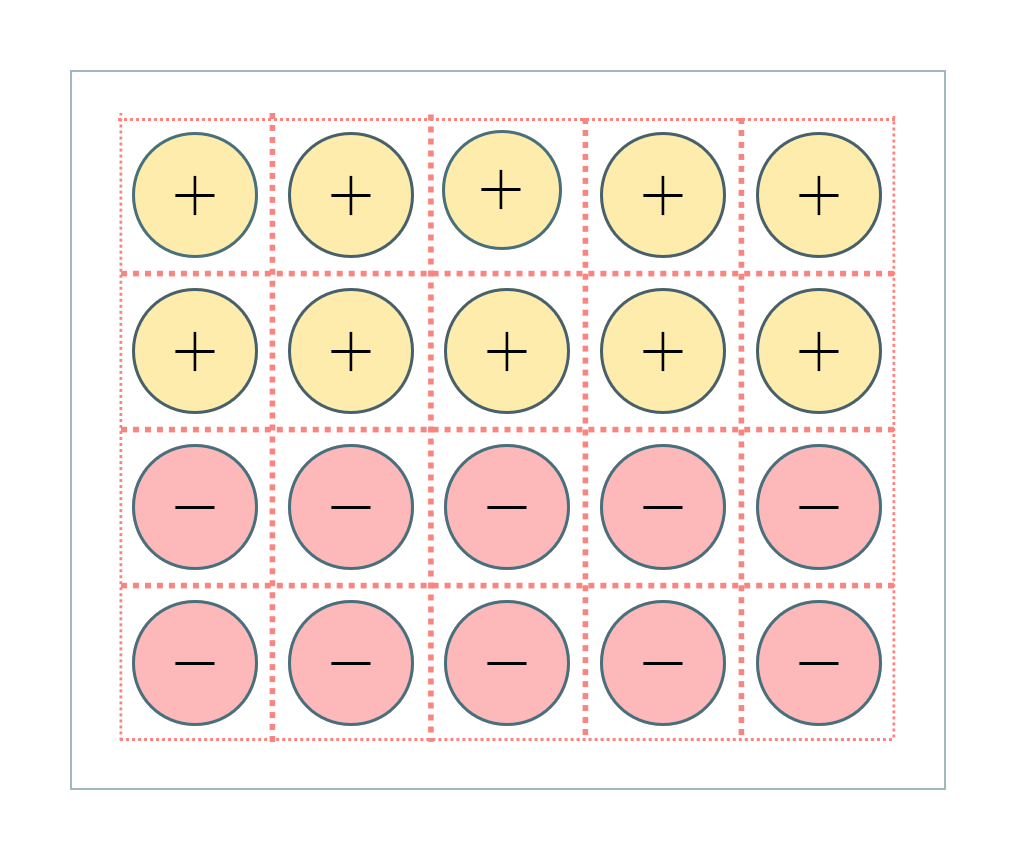
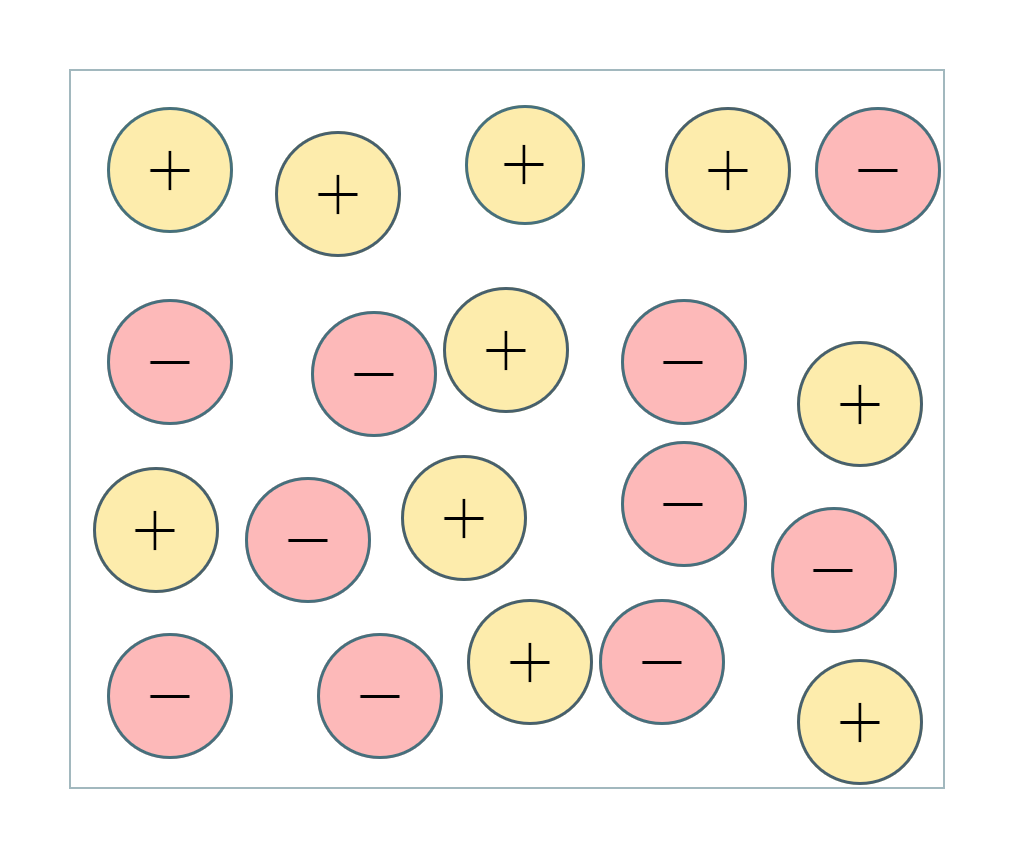
Don't restrict chip organization within the grid.
An important insight we gained was that students have different preferences for chip placement and organization in the workspace. Therefore, we shouldn't restrict how students can arrange chips within the grid.
Chip Bank is tricky.
It's tricky because the chip bank design directly affects how users add chips to the workspace. We faced 2 design options.
Option 1: Action Bar Buttons
- Design: The action bar component exists in most ALEKS tools. Users can interact with buttons in it to add/remove chips, undo actions, or restart the question.
- Pros: This design is very compact and has a similar look compare to other ALEKS tools.
- Cons: Students might have difficulties figuring out chips in the action bar can't be dragged.
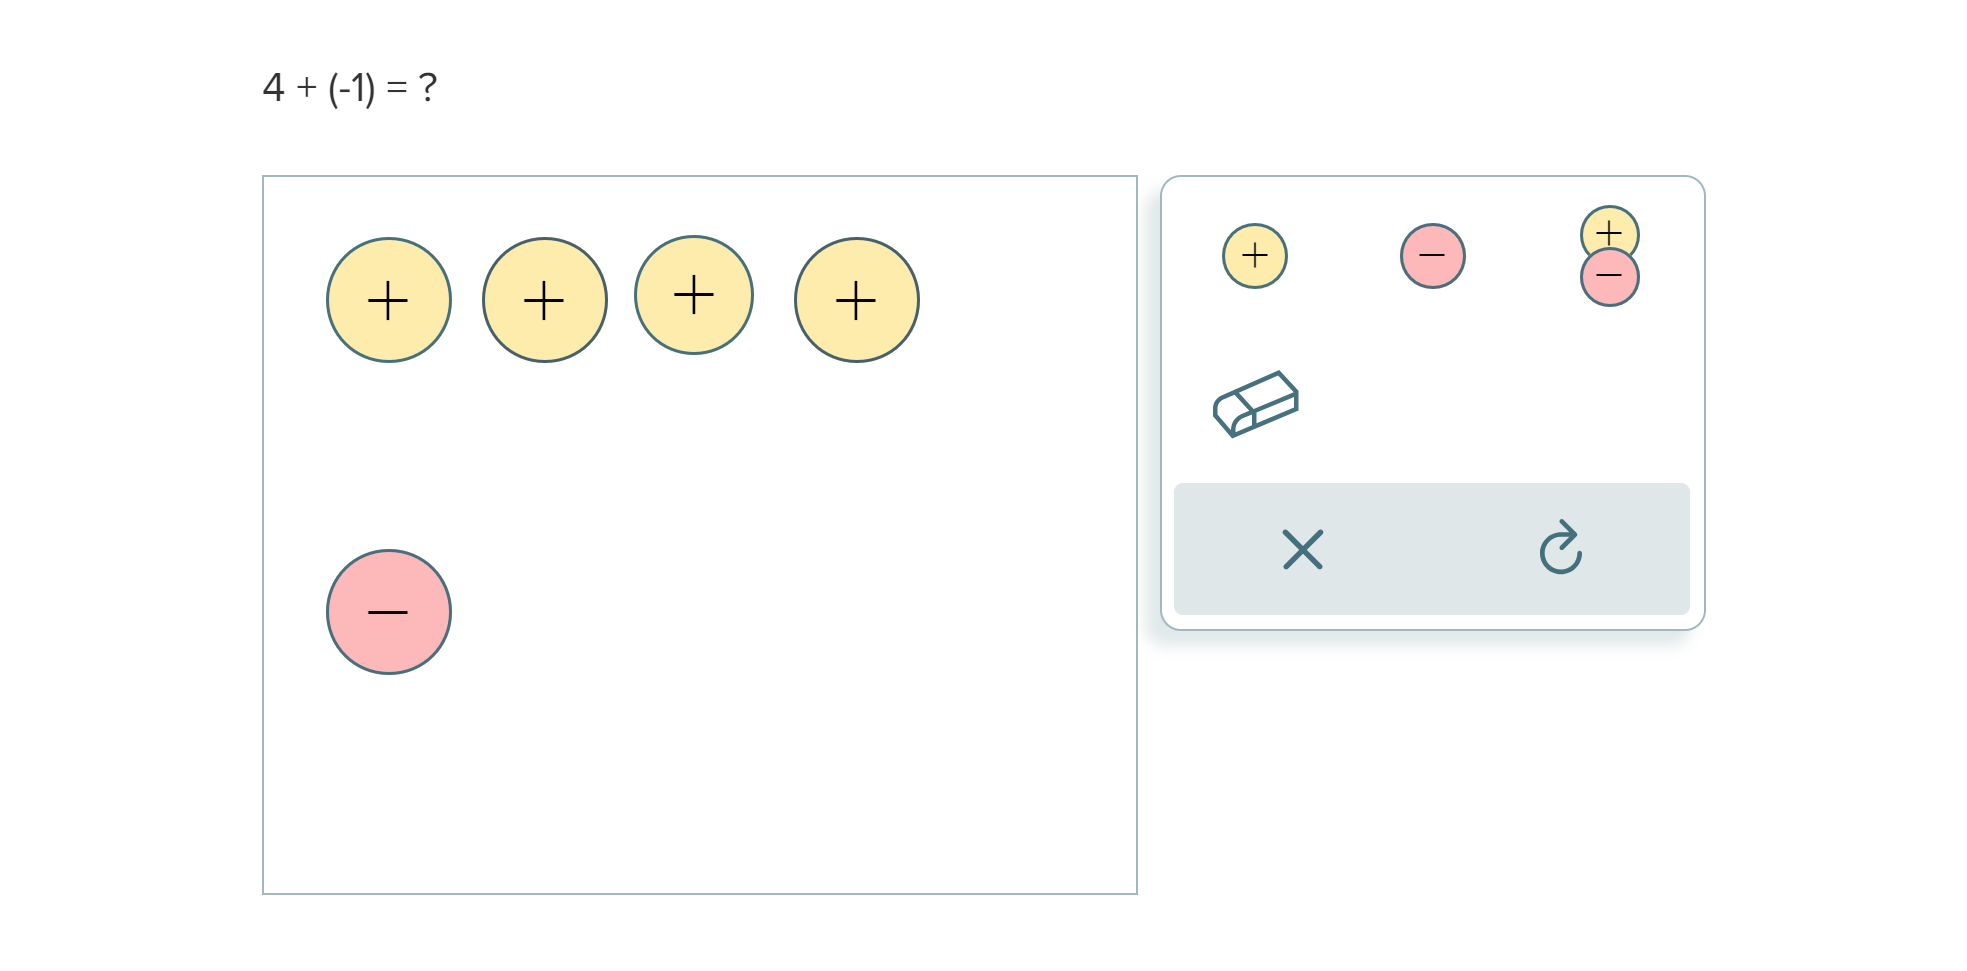
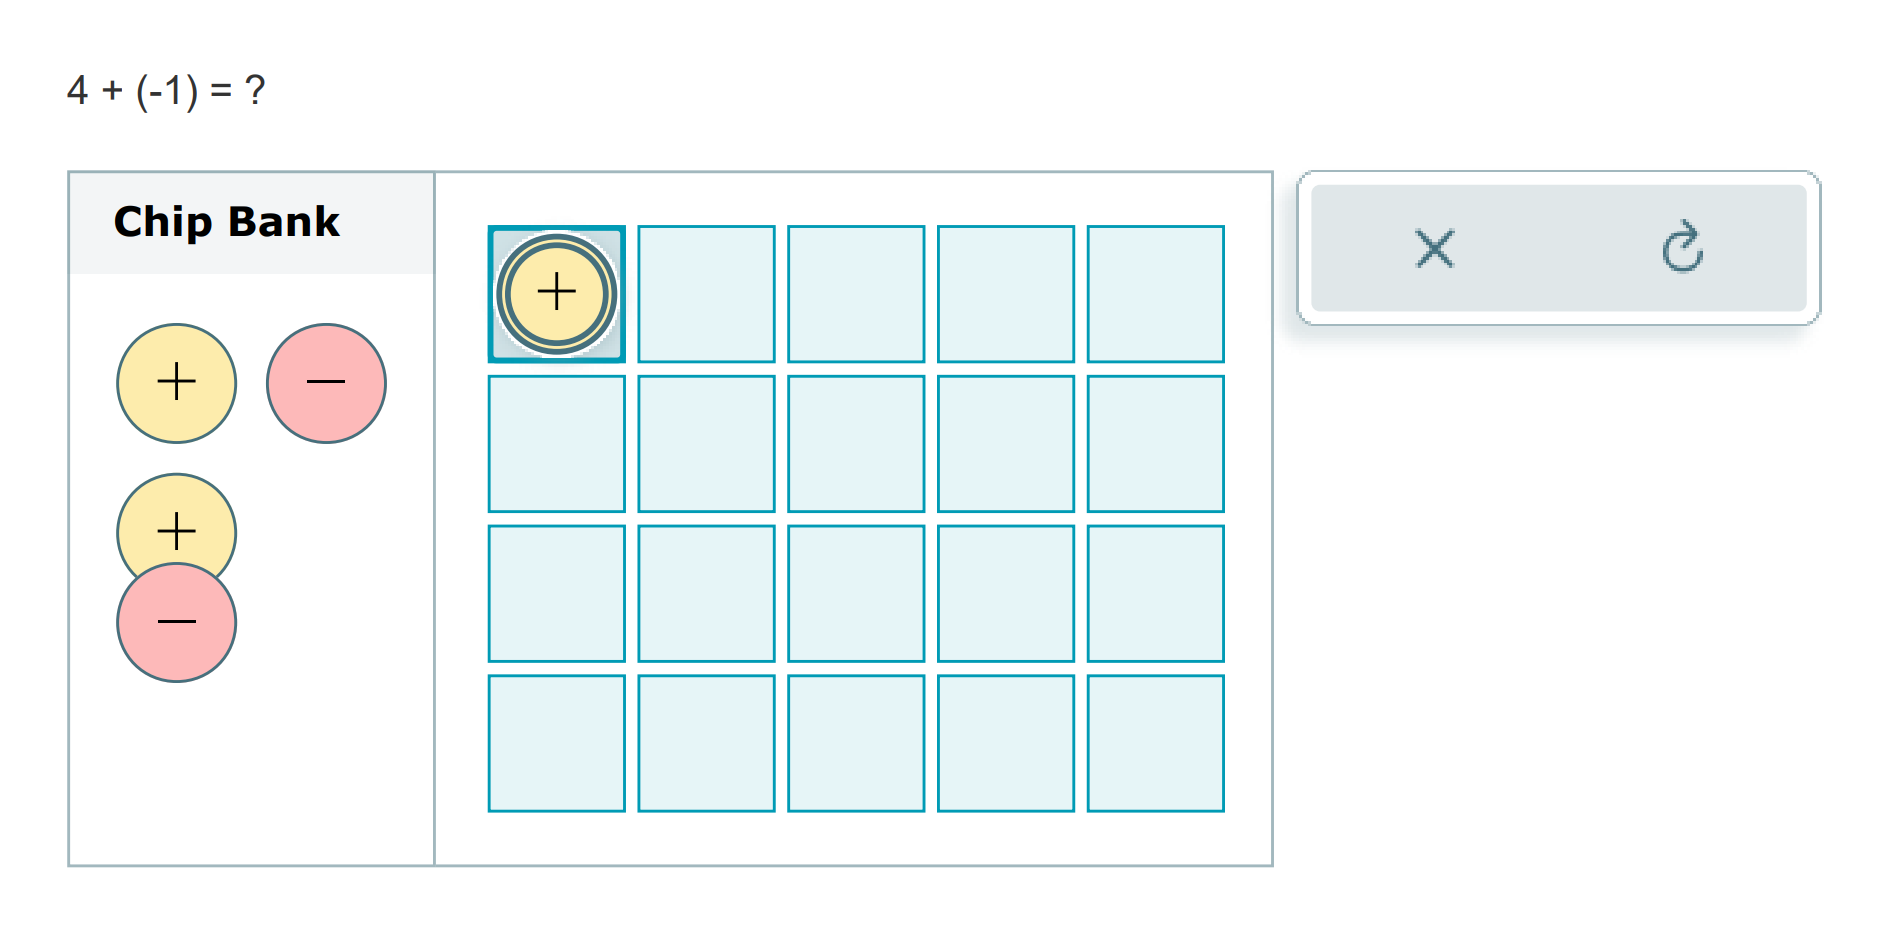
Option 2: Drag & Drop
- Design: The chip bank is separated from the action bar. Users can drag chip from the chip bank to the workspace.
- Pros: Both the interaction and layout are similar to physical Integer Chips. Many students would know how to use this tool immediately.
- Cons: Drag & drop requires efforts to make it accessible. Also, since the action bar component is still needed for undo and restart buttons, it would need to be floating on the right.
We went with drag & drop.
- Its advantages outweigh the weaknesses.
- Accessibility could be challenging, but it's achievable.
- The action bar has many usability issues. There are plans to revamp it soon, which could impact this project.
Design Decisions for Drag & Drop
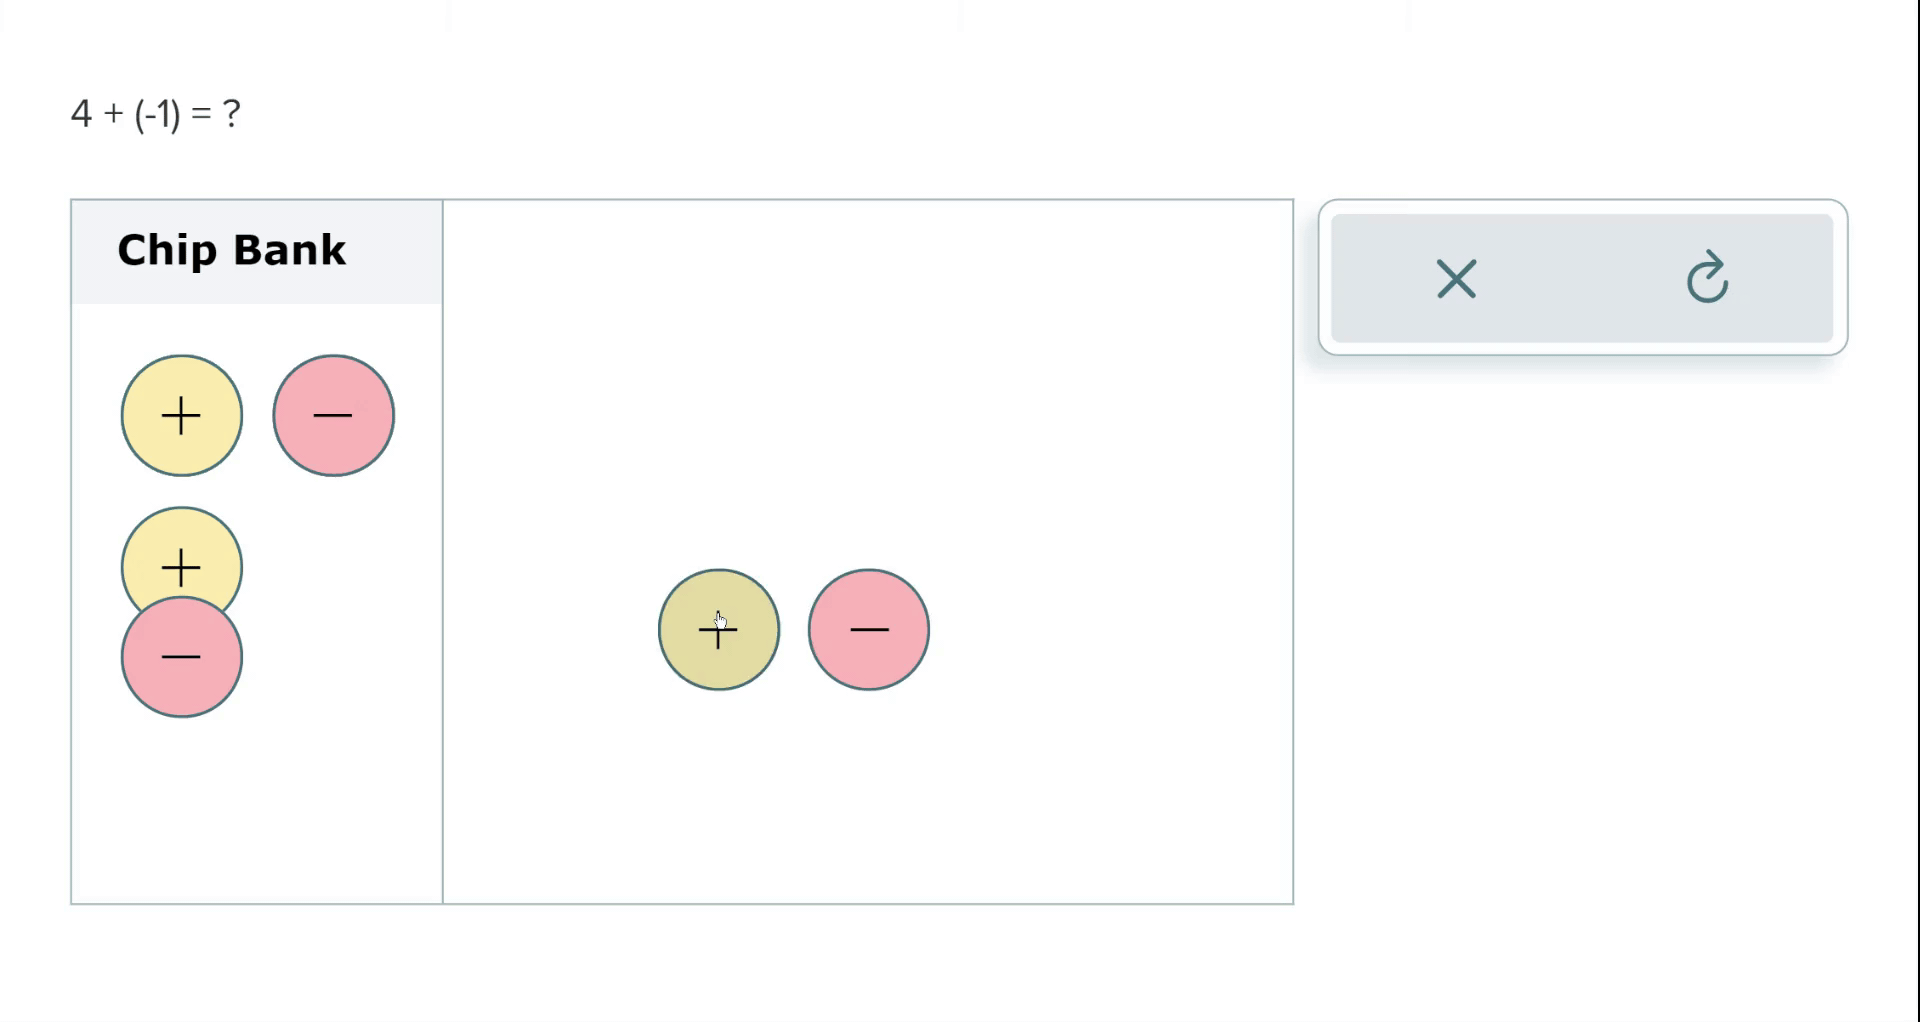
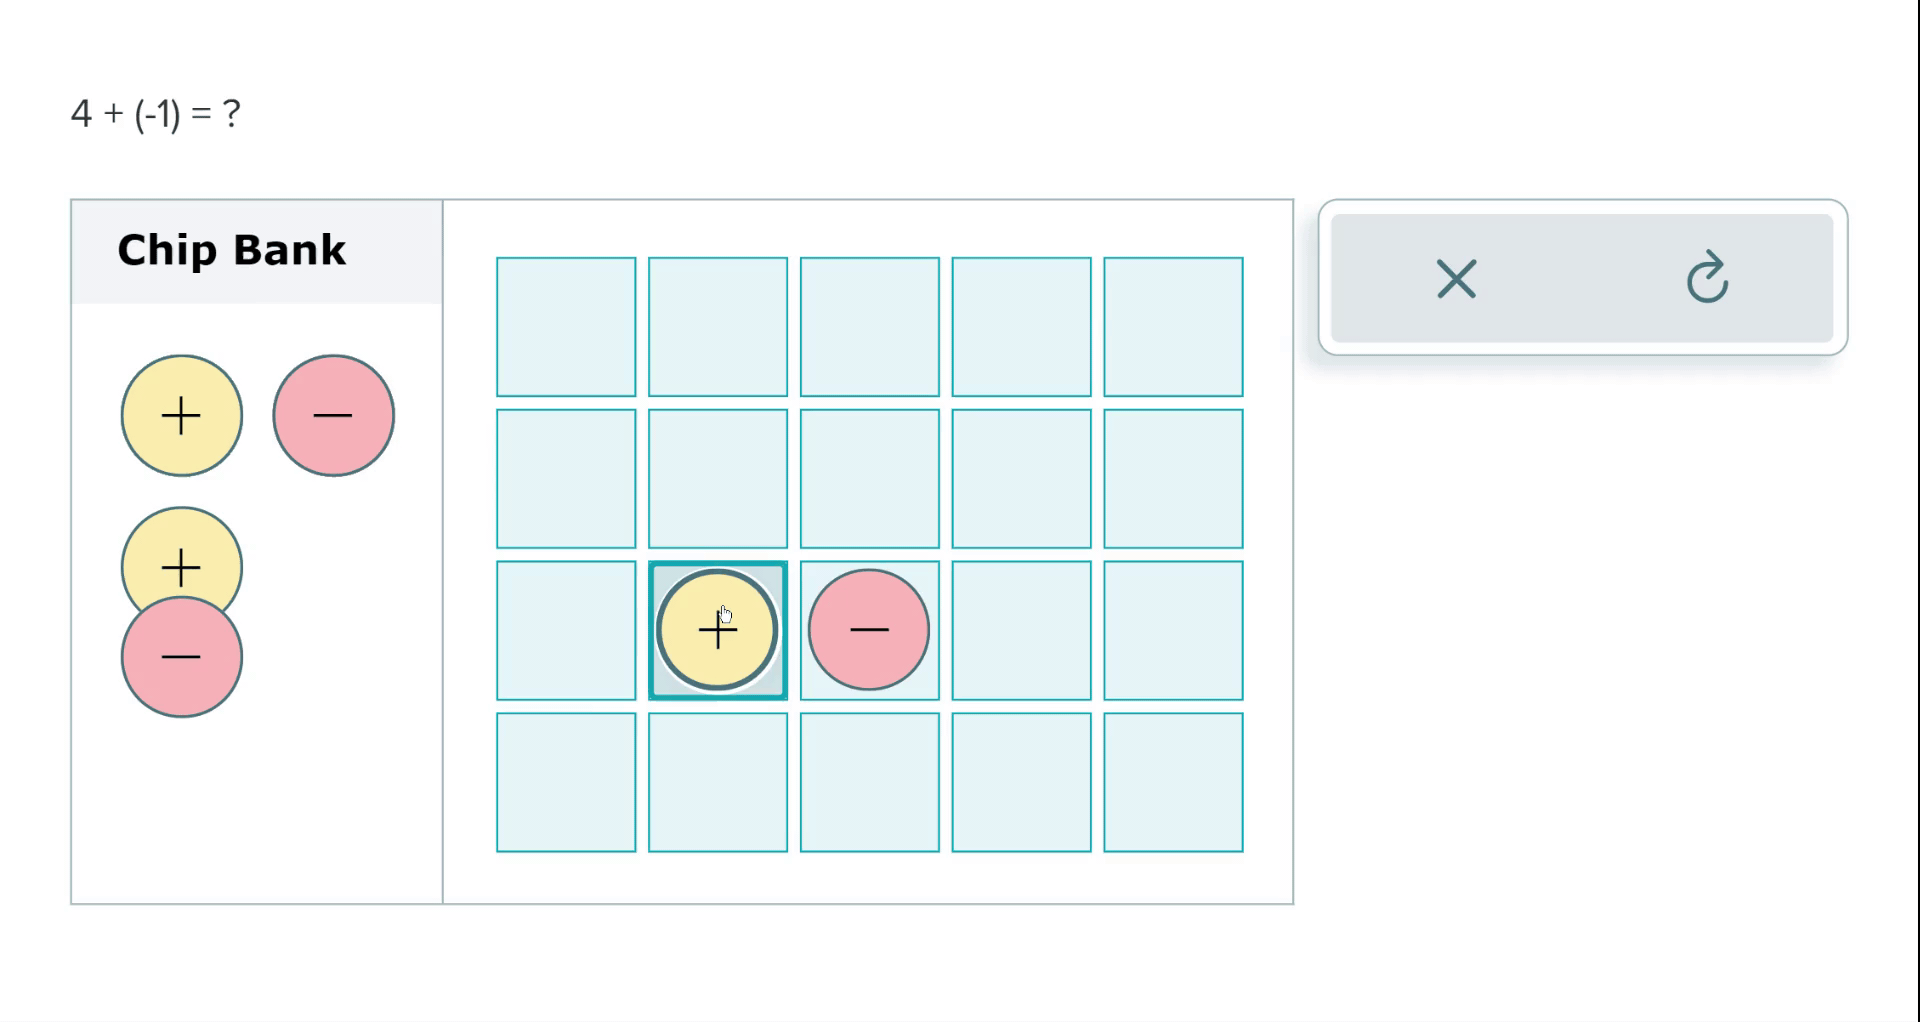
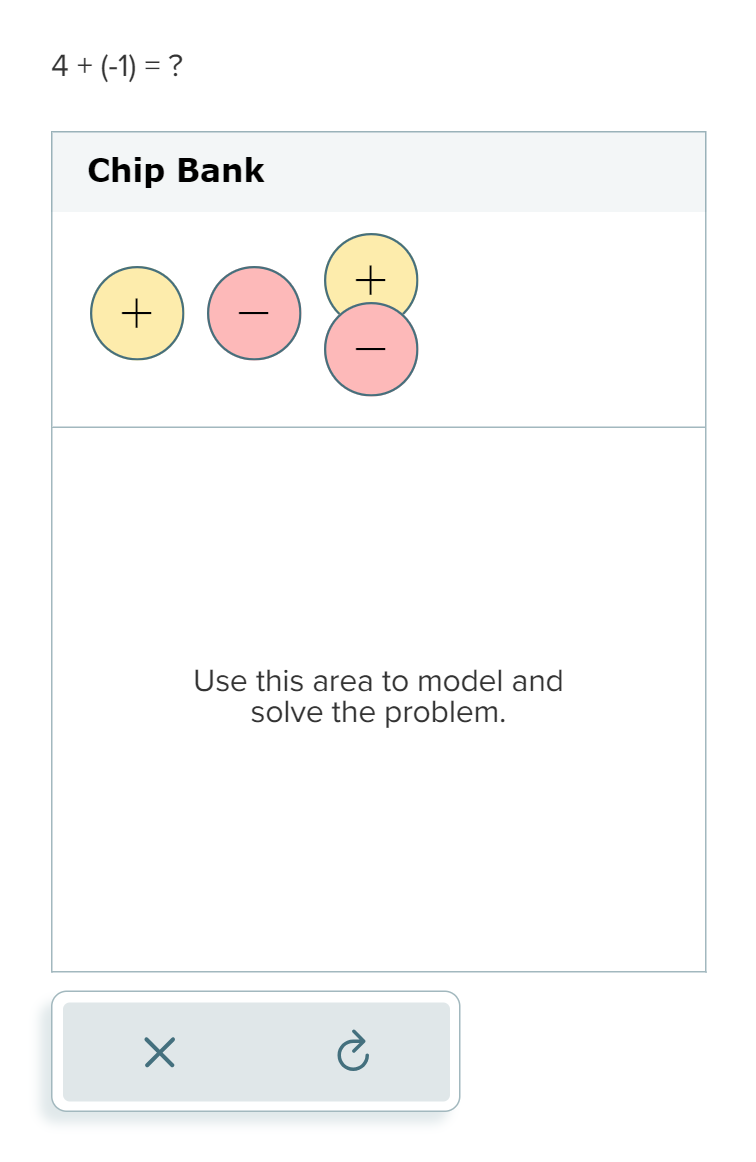
Adding Chips
- To indicate drop zones, highlights are added in the workspace.
- Upon hovering a chip over a drop zone, a darker highlight would signify the chip's placement.
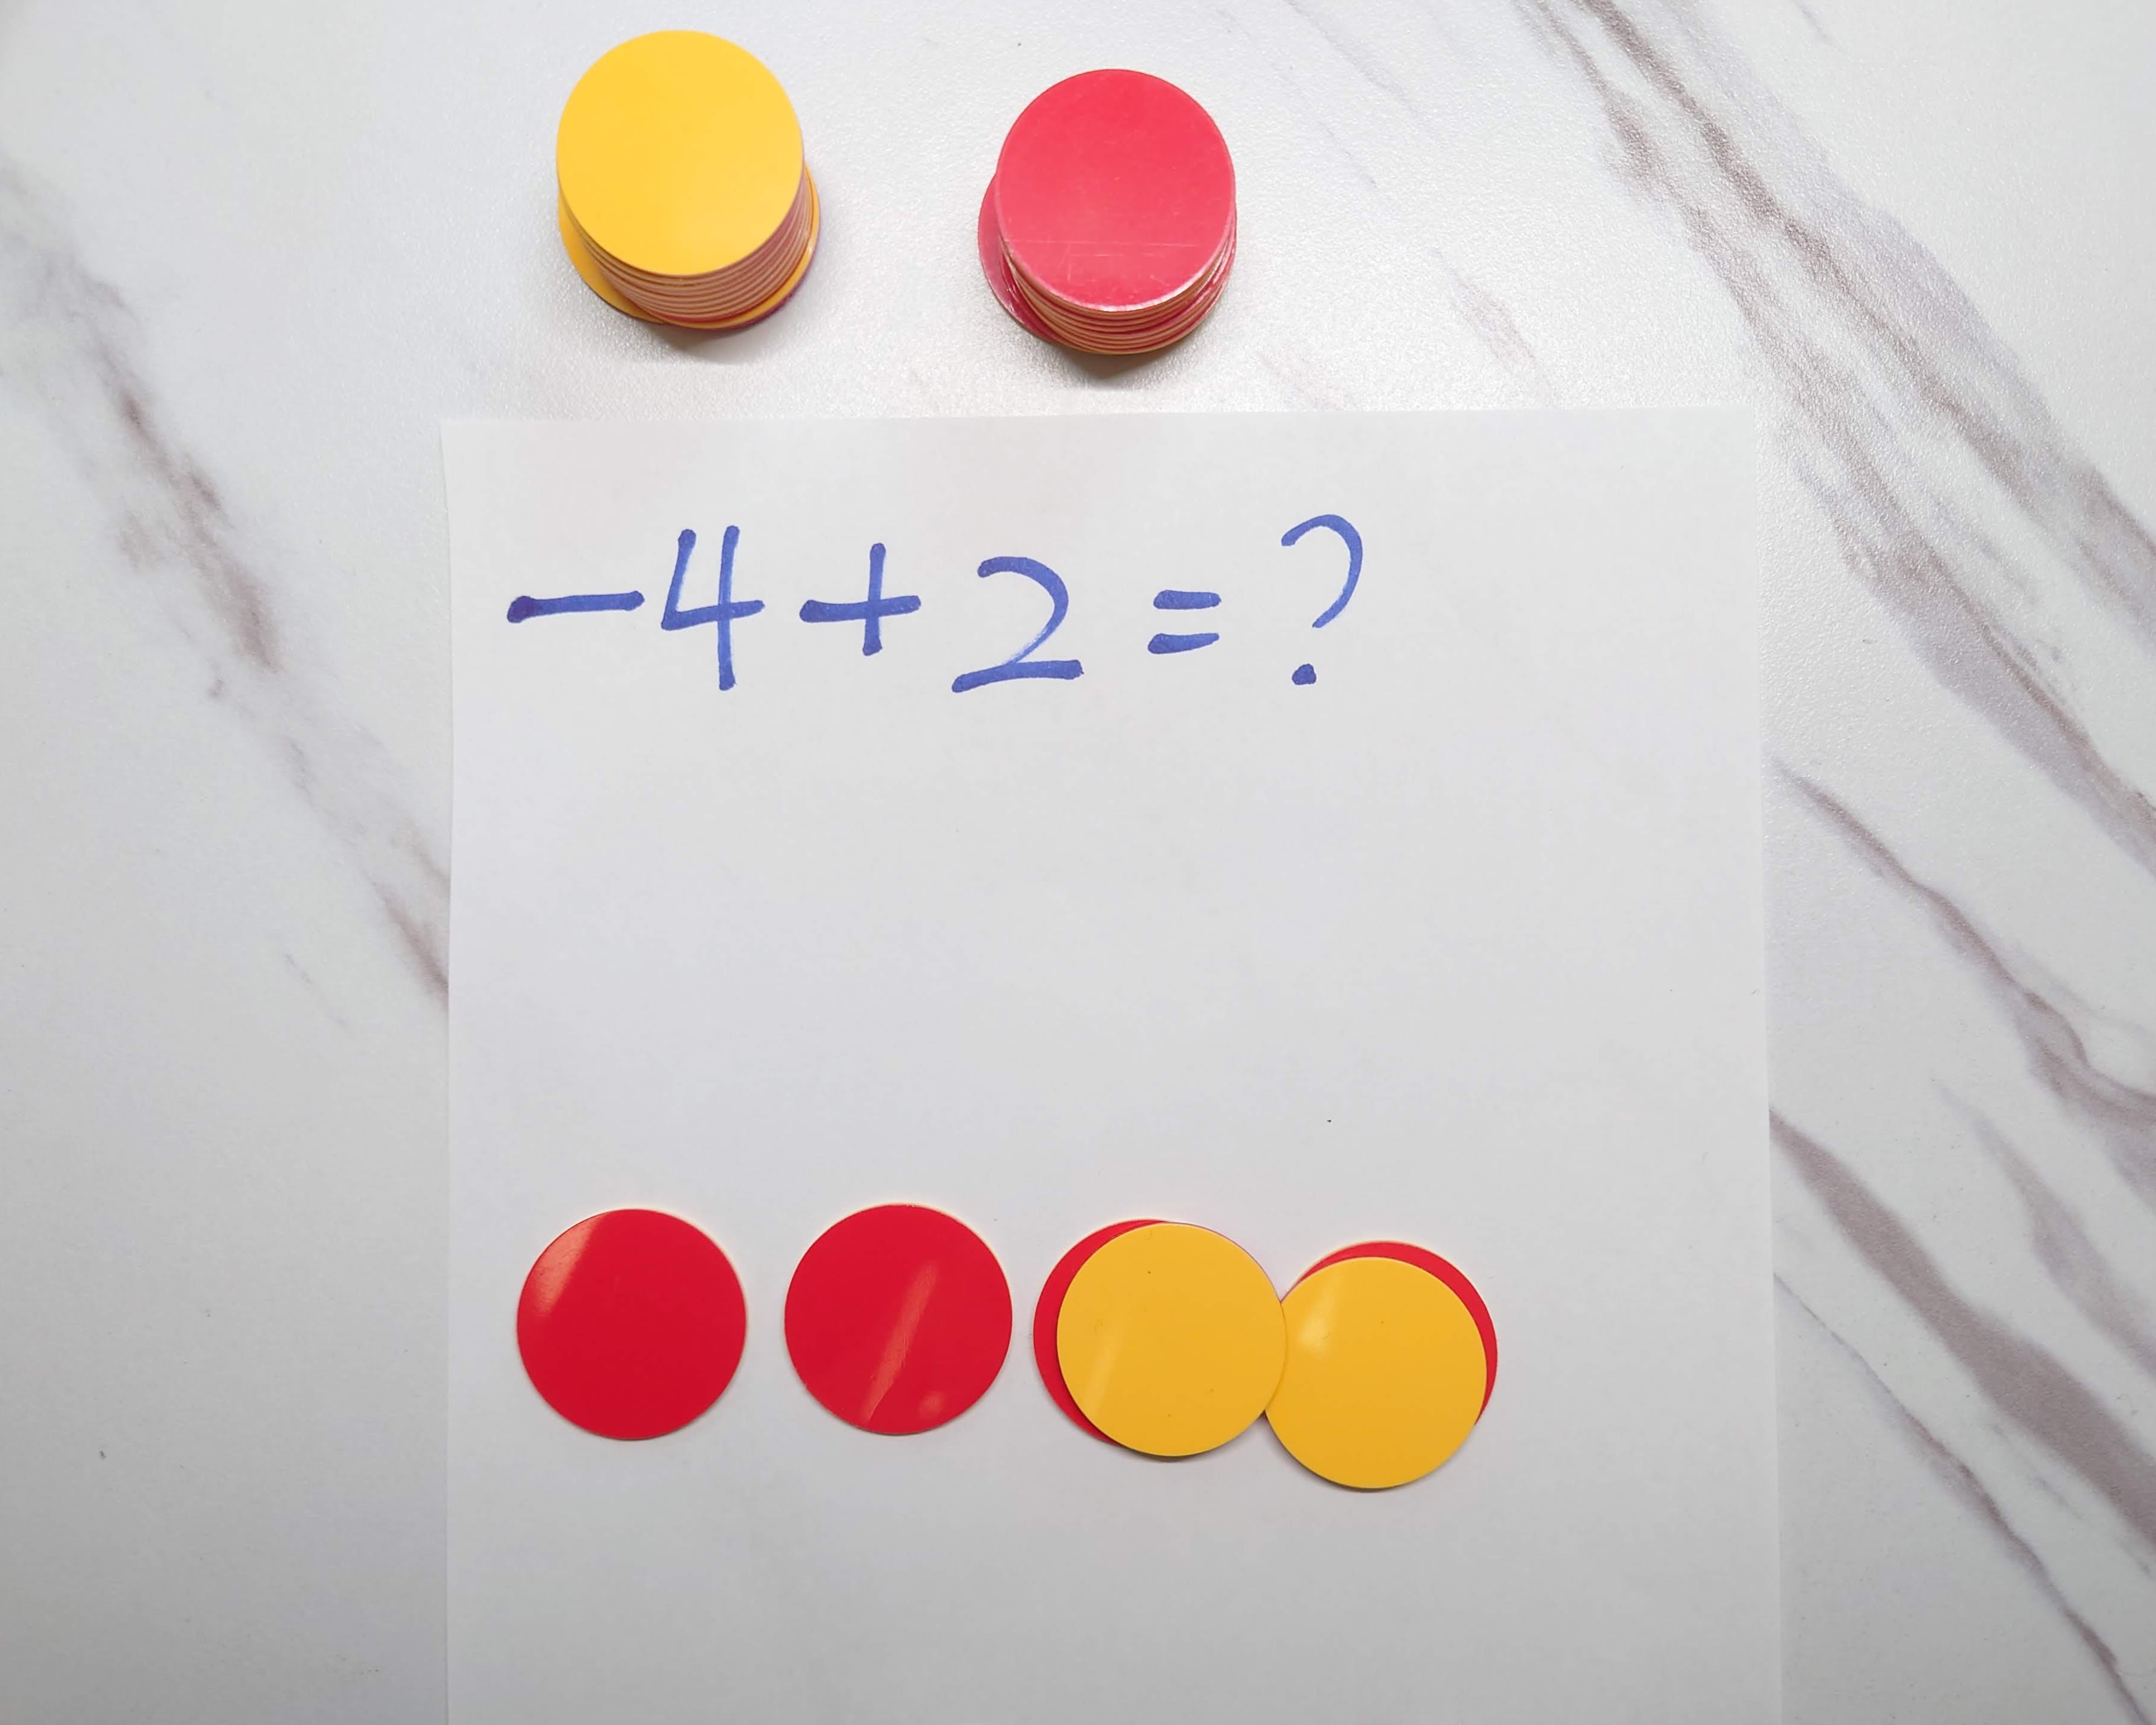
- Users can add a single chip or a zero pair.*
*Adding zero pairs is helpful for subtraction questions.
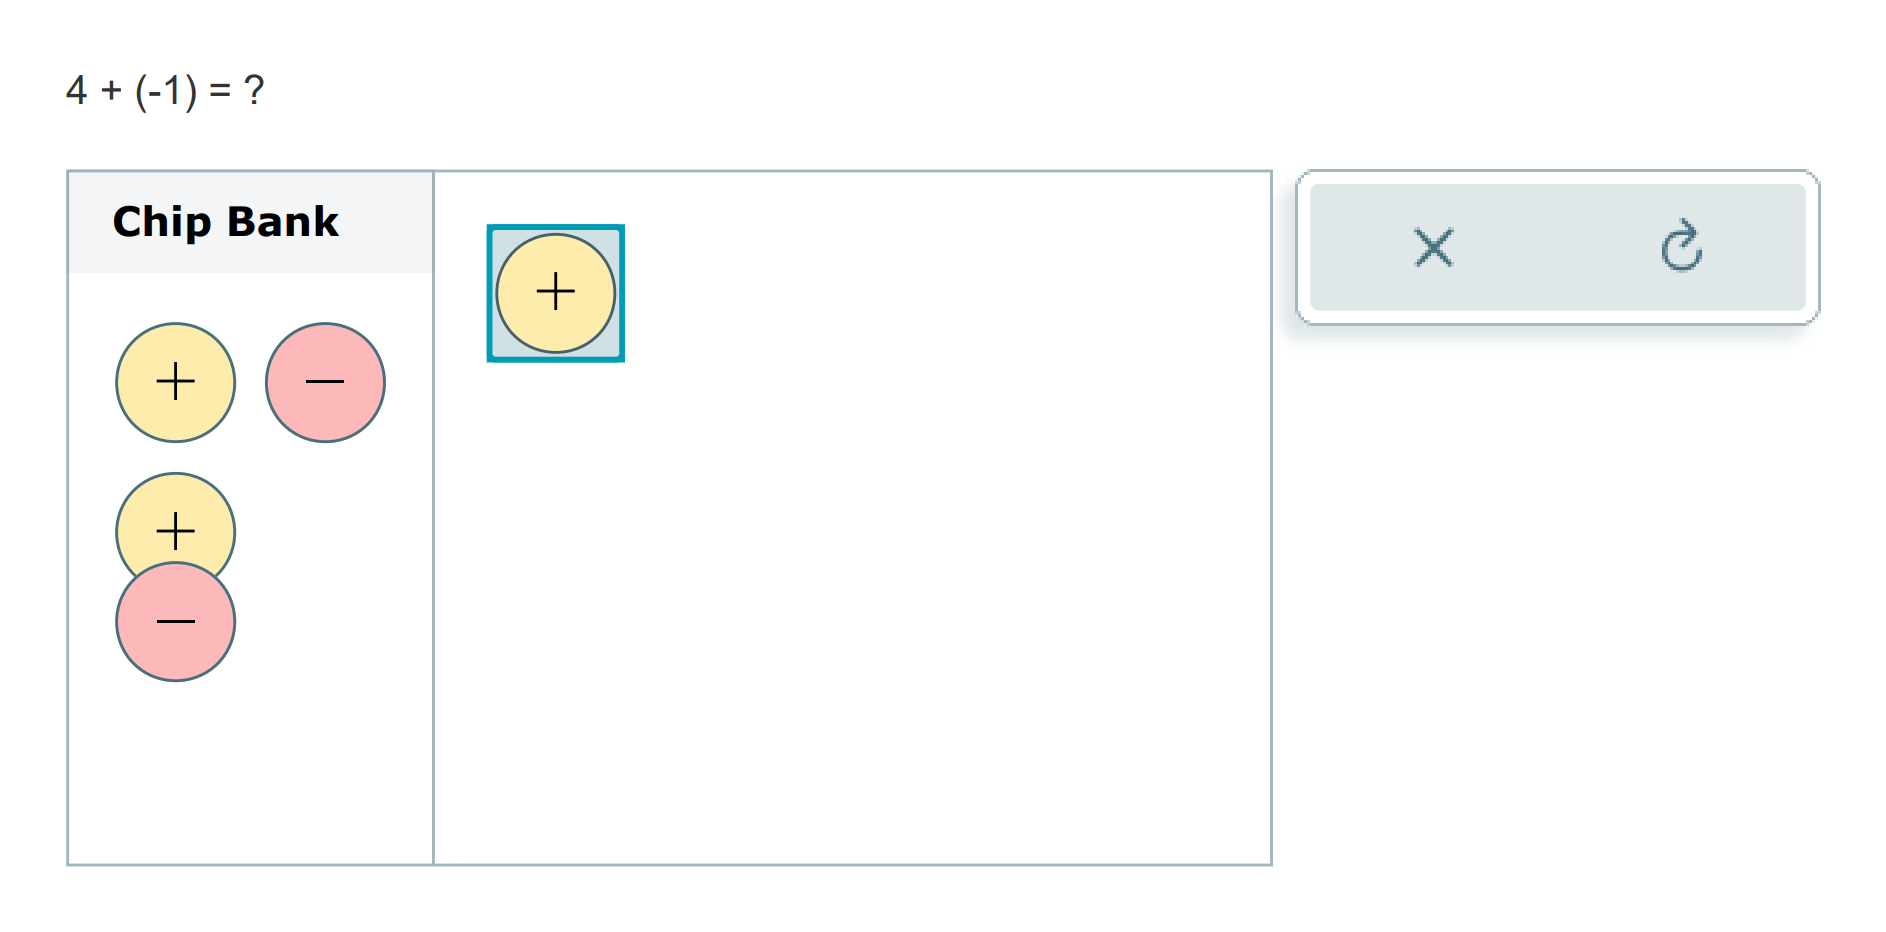
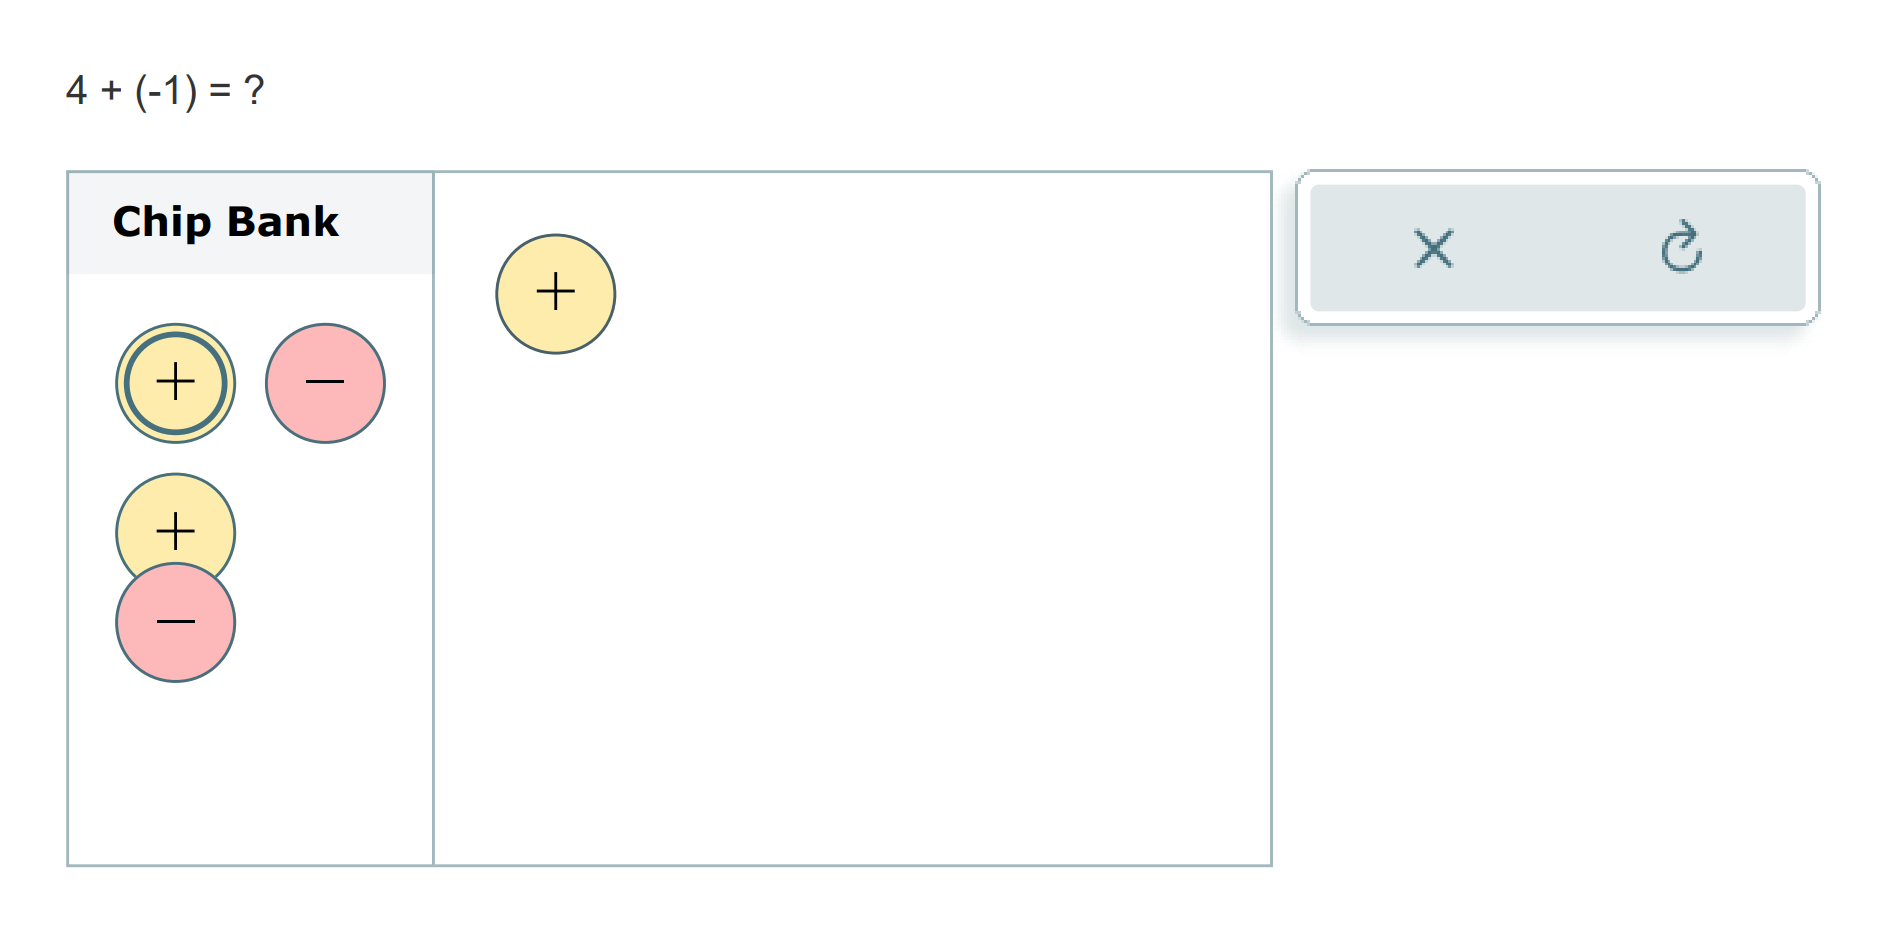
Removing Chips
The team discussed various methods for removing a chip from the workspace. Ultimately, we settled on the following design, as it closely mirrors the experience of using physical Integer Chips.
- If a chip is dropped outside the workspace, it will be removed. This means moving a chip back to the chip bank will also remove it.
- Chips will turn grey to indicate potential removal.
Canceling Zero Pairs
- To cancel a zero pair, students can choose to individually remove a positive chip and a negative chip.
- Students can also overlay a positive chip with a negative chip to cancel them.
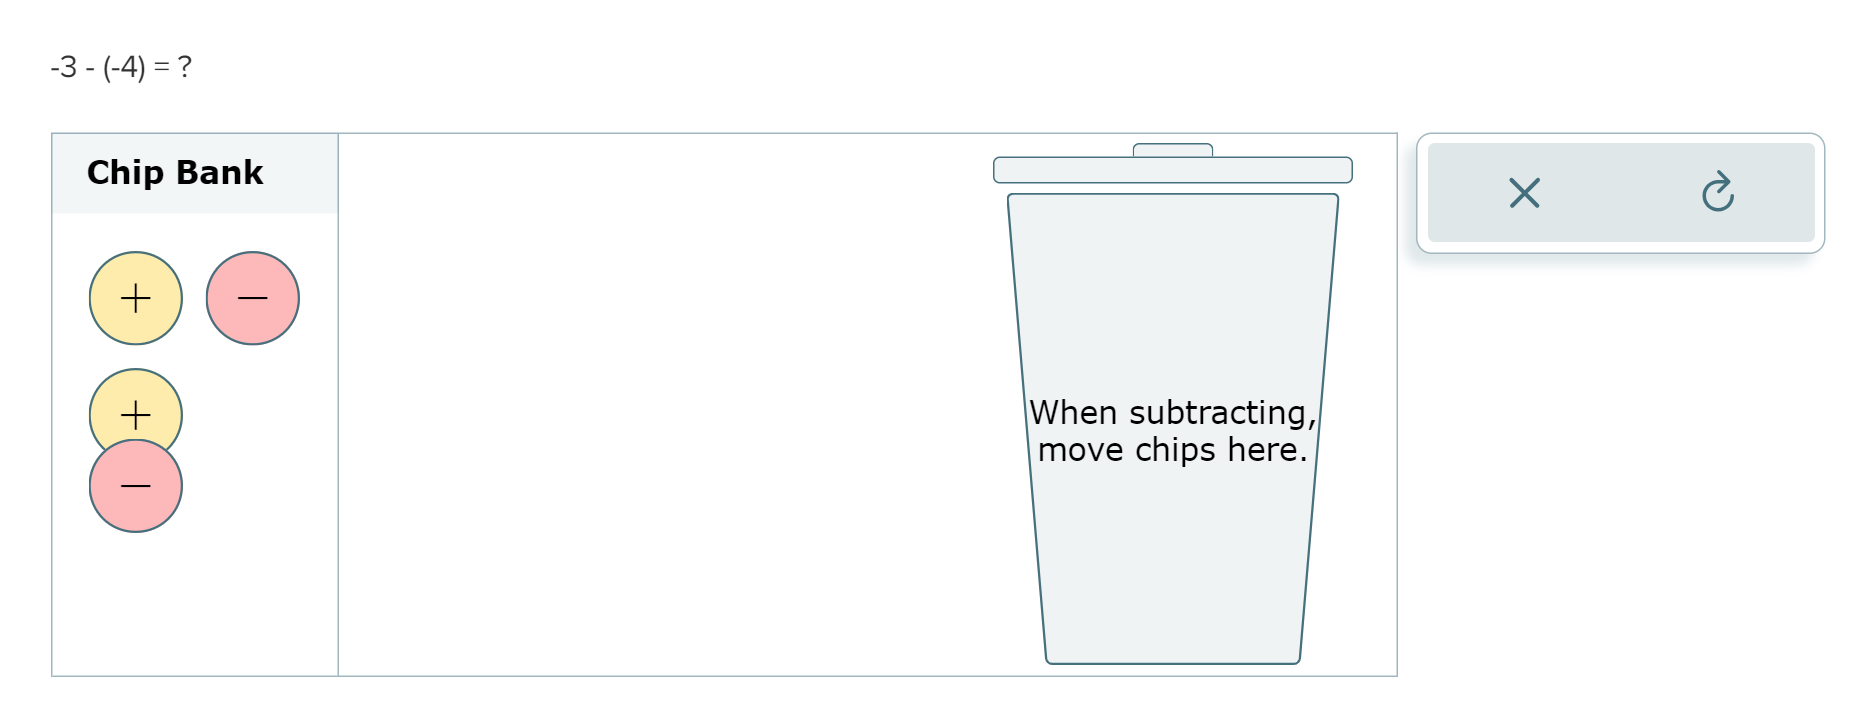
We included a Trash Bin for subtraction problems.
The trash bin is included due to a request from math specialists. Using the trash bin is the recommended way of solving integer subtraction problems.
Error Messages
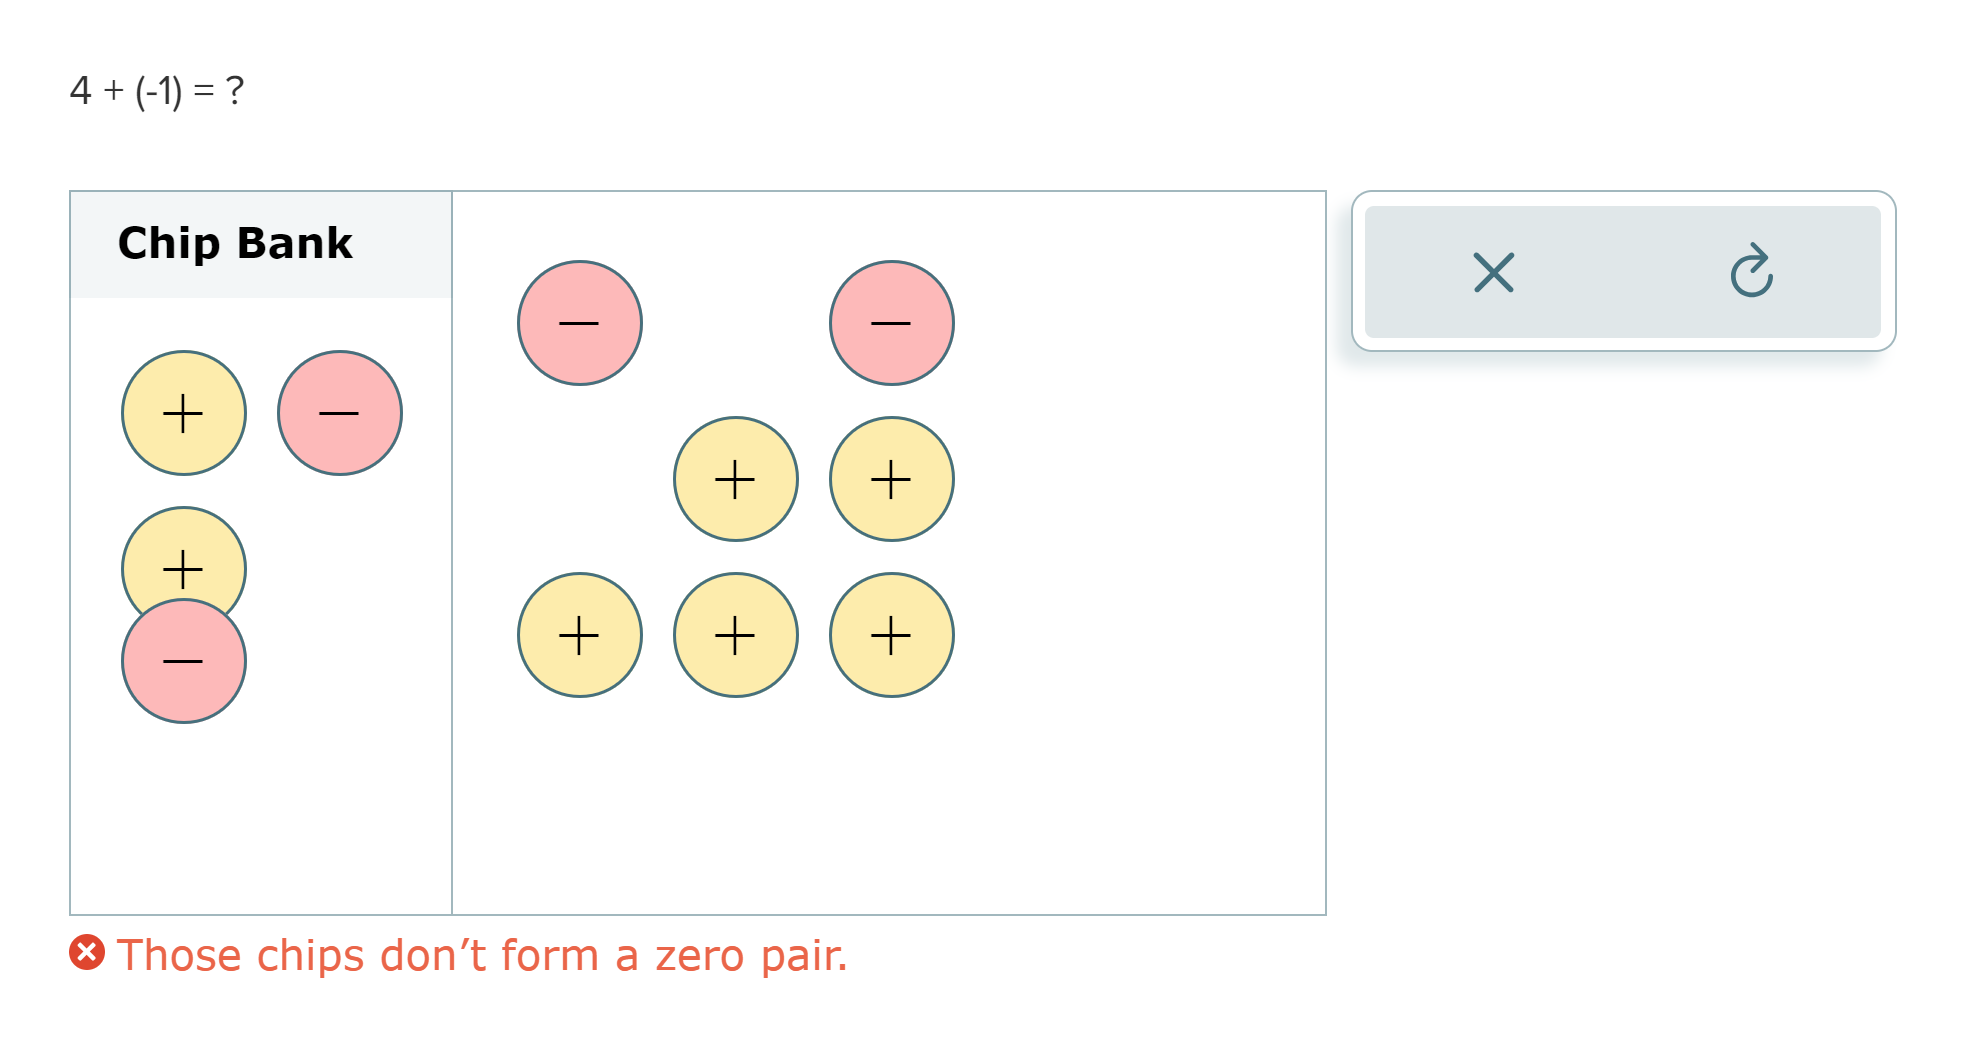
I designed 2 types of error messages to provide feedback and hints.
- Immediate Feedback: If a student attempts an unsupported action, they will receive immediate feedback. For example, if a student tries to overlay 2 positive chips, the message would be "Those chips don’t form a zero pair."
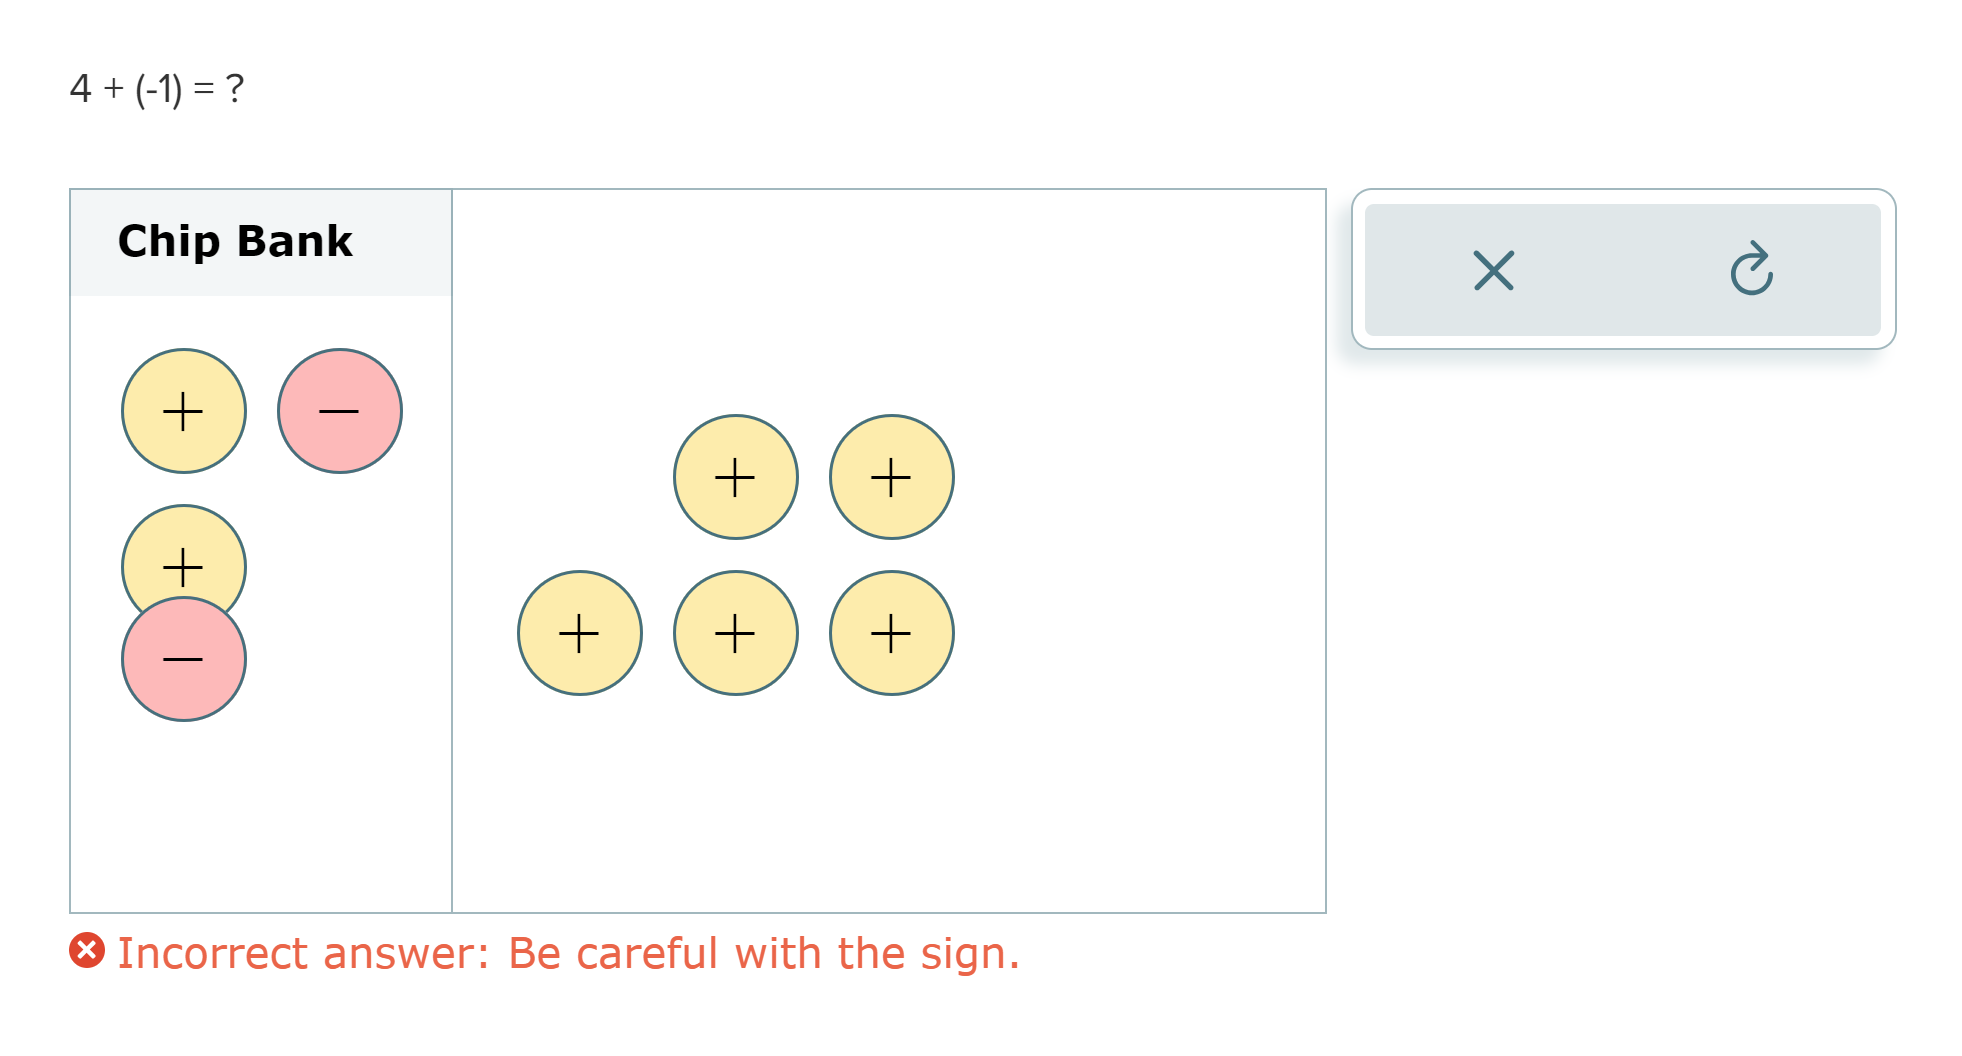
- Answer Submission: ALEKS will check if the submitted answer is correct. If the answer is incorrect, the error message will give students a hint.
We removed trash bin based on usability testing.
We conducted user testing with 7 middle school students and their teachers. We gathered 2 insights.
- Trash Bin: All students were confused by the trash bin. It seemed using trash bin was not the standardized way of teaching Integer Chips.
- Adding Zero Pairs: Only 2 students understood the intended purpose of adding zero pairs, but they still find this feature helpful. Many of them used it as a short cut to add multiple chips at once.
Hence, we decided to remove the trash bin but keep the ability of adding zero pairs.
Putting It All Together
Regular Display
Reflow
Interactive Prototype
Feel free to play around with the interactive prototype :)
Designing for Keyboard and Screen Reader Users
Making Drag & Drop Accessible
There are 3 popular approaches for making drag & drop accessible.
- Provide keyboard users a more accessible interaction, such as clicking buttons.
- Implement a menu that includes all the drop zone options.
- Use Space/Enter + arrow keys as a replacement for drag & drop.
I chose the third option.
- Disabled users, especially users with visual impairments, rely more heavily on spatial cues than nondisabled users. Thus, a simplified interaction won't satisfy their need.
- If we implement a menu, it would entail more than 20 options to encompass all potential drop zones. Moreover, for sighted keyboard users, this wouldn't offer an optimal experience.
- Space/Enter + arrow keys is a relatively standard drop & drop accessible alternative. Although it takes effort to implement, it doesn't have any huge drawbacks.
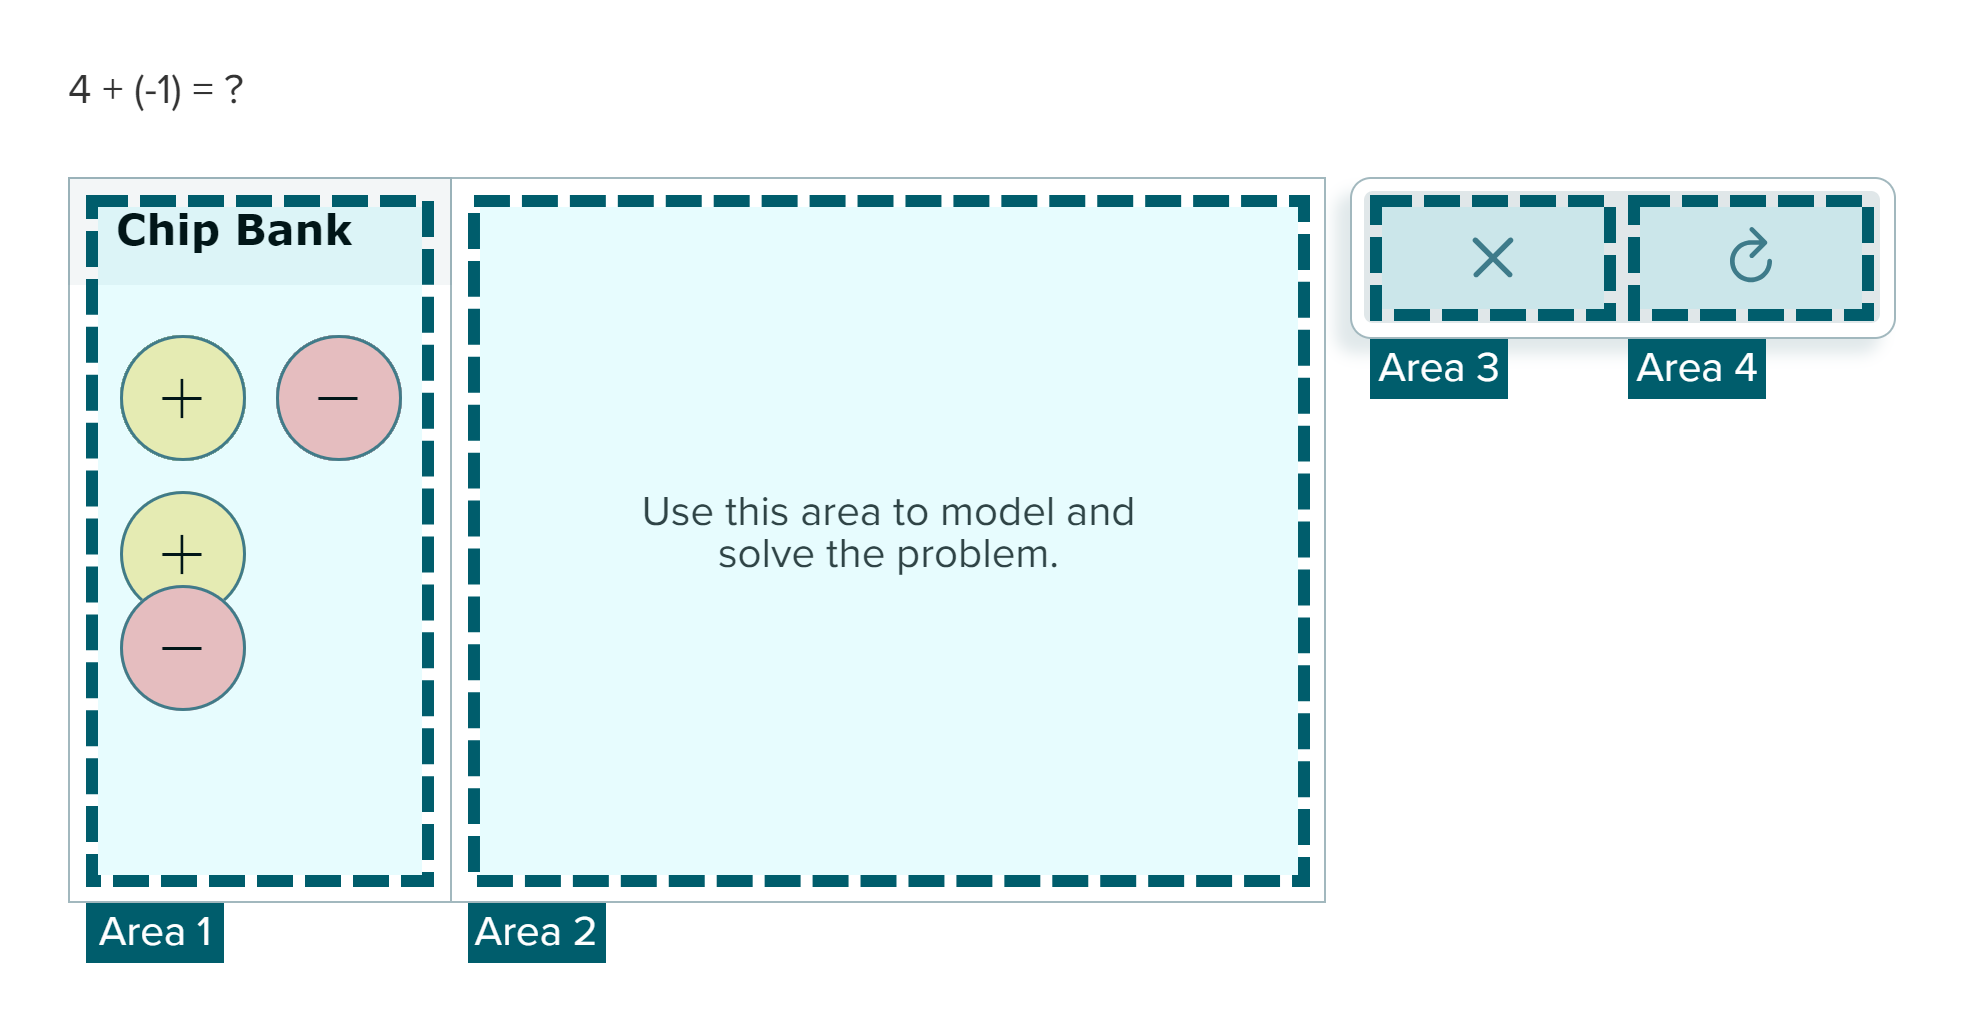
Tab Areas
- Area 1: Chip Bank
- Area 2: Workspace
- Area 3: Undo Button
- Area 4: Restart Button
Let me walk through an example.
There are a lot more interactions and cases that users may encounter. This simple example is just intended to provide a little snapshot of the experience.
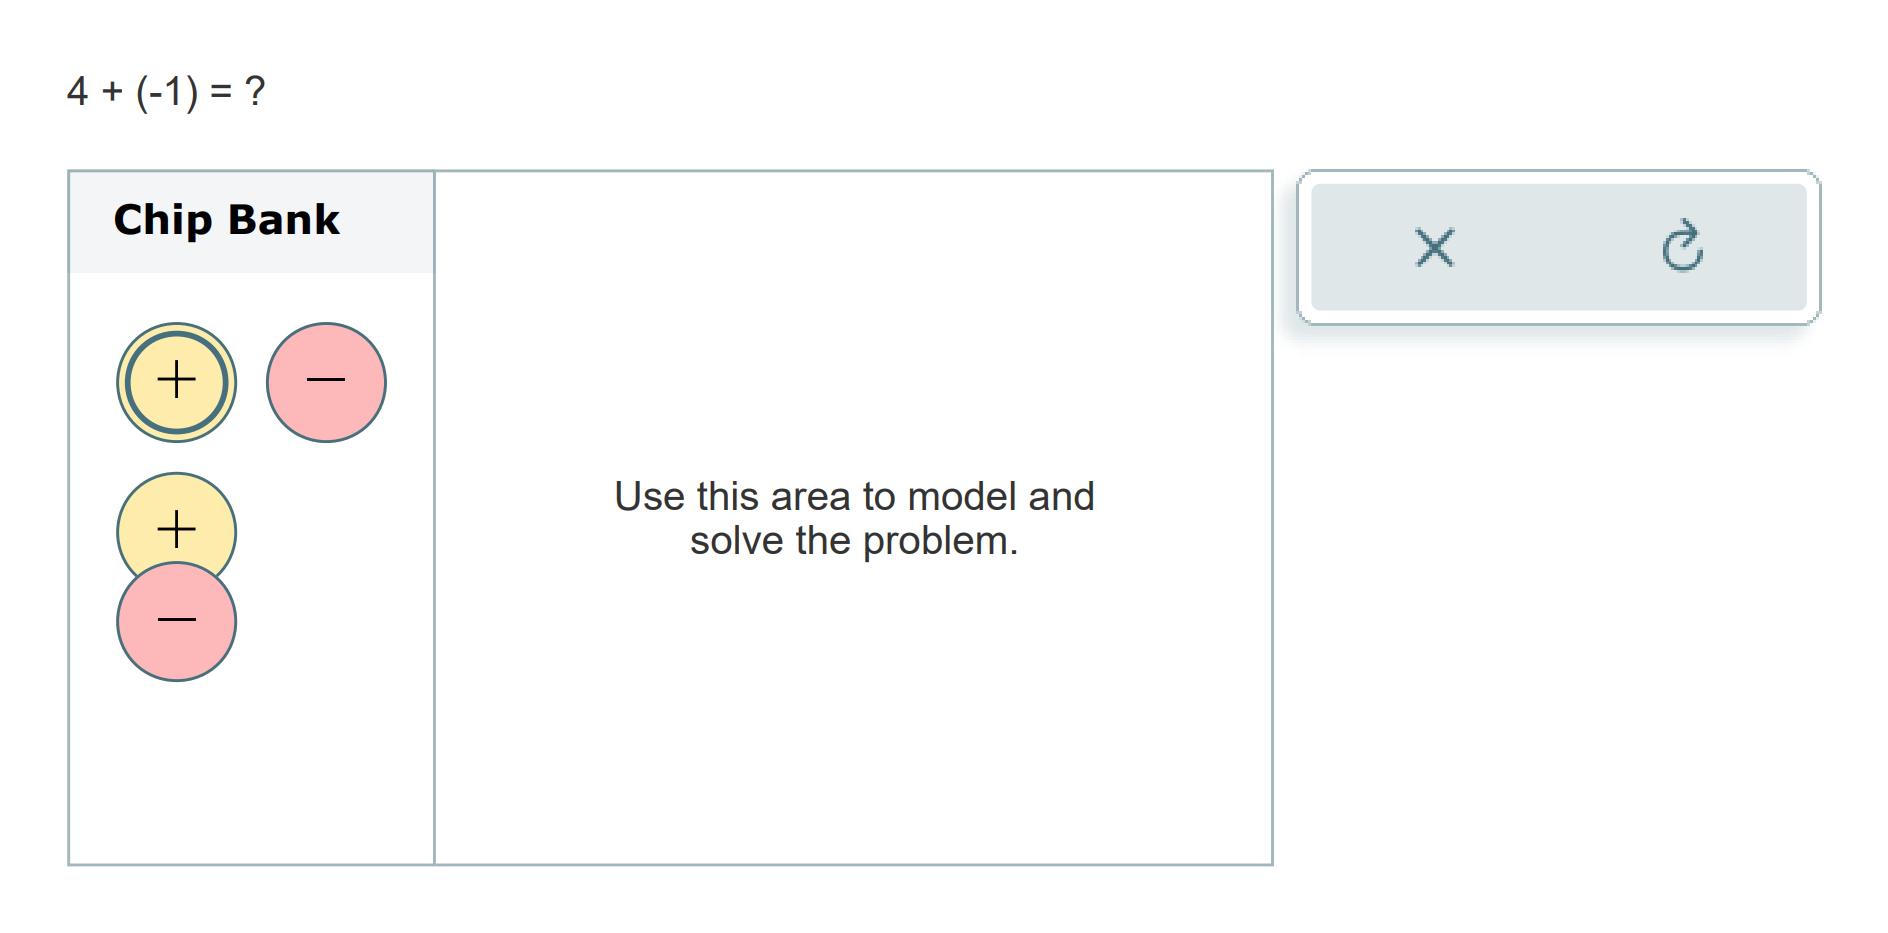
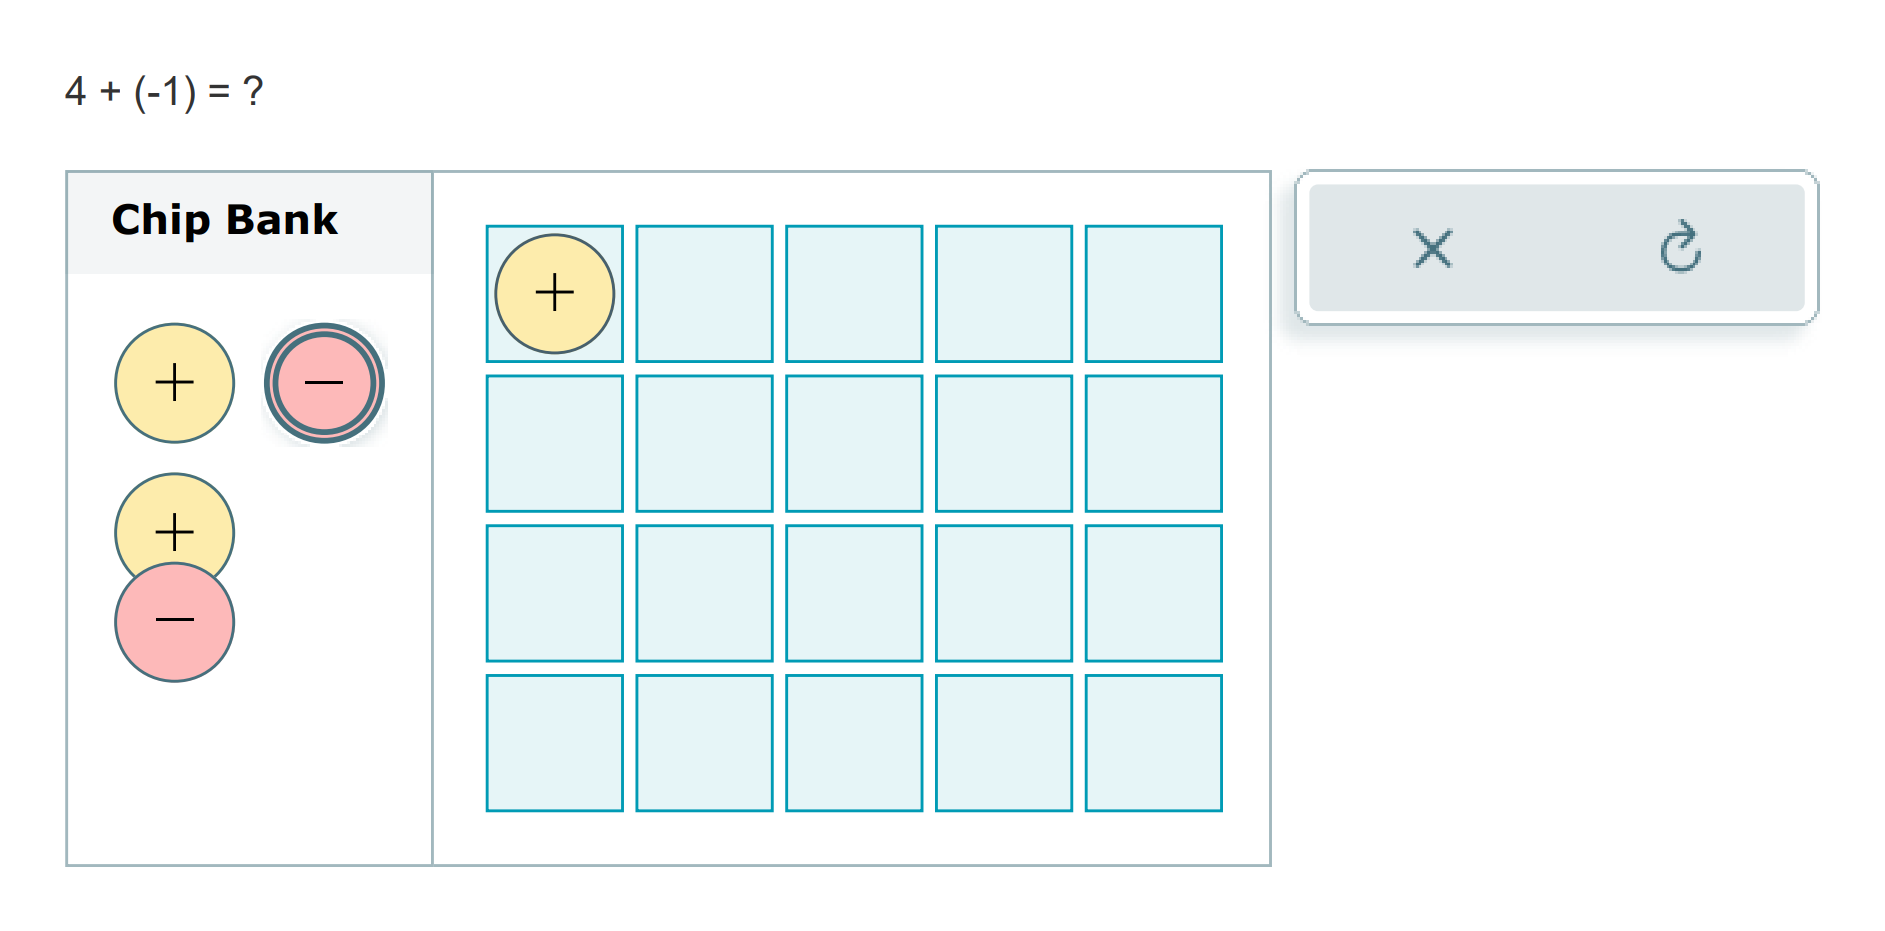
Interaction 1
- Action: Tab to move focus to the chip bank.
- Result: Focus moves to the stack of positive chips.
- Screen Reader: "Integer Chip Editor. The workspace has 0 positive chip and 0 negative chip. You have reached following location in the chip bank: the stack of positive chips. To move to a different location within the chip bank, use arrow keys. To move between the chip bank and the workspace, use the tab key. After reaching the desired location, press the space key to select a chip or to drop a chip."
Interaction 2
- Action: Press the spacebar to select a chip.
- Result: A positive chip is picked up.
- Screen Reader: "A positive chip is selected. To move between the chip bank and the workspace, use the tab key. After reaching the desired location, press the space key to select a chip or to drop a chip."
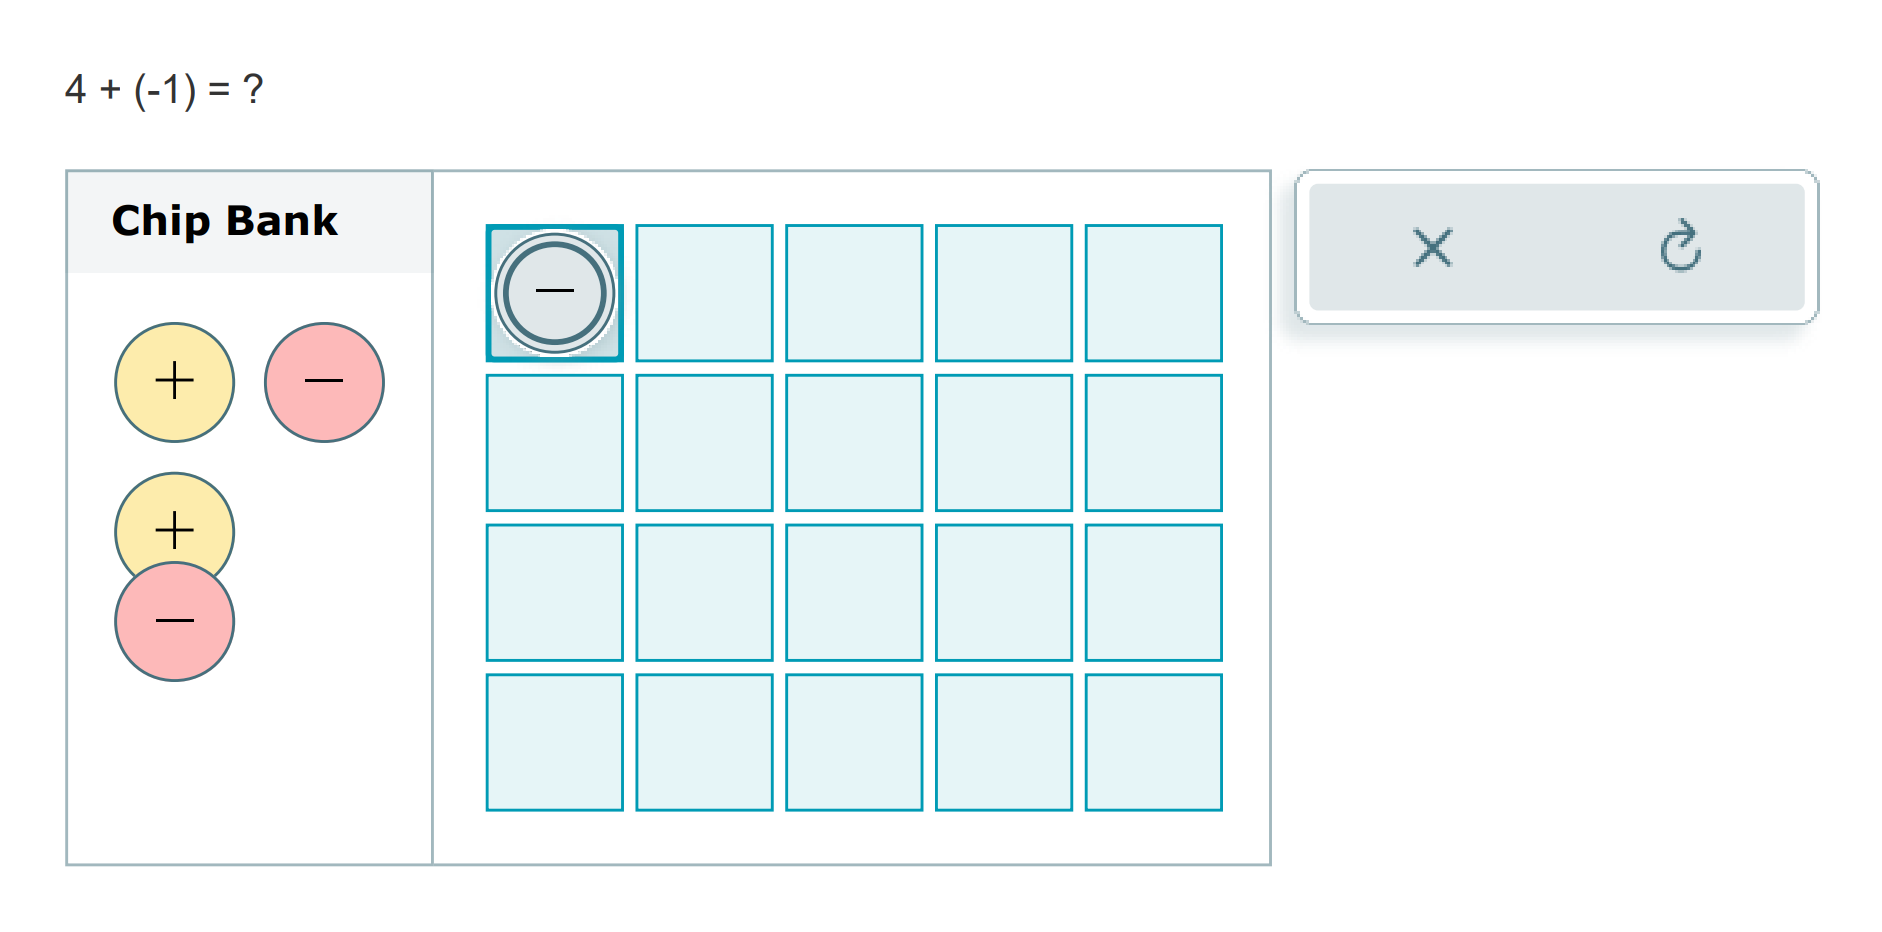
Interaction 3
- Action: Tab to move the chip to the workspace.
- Result: Both the focus and the chip move to row 1, column 1 of the workspace.
- Screen Reader: "The workspace has 0 positive chip and 0 negative chip. You have reached the following location in the workspace: row 1, column 1. This location is empty. To move to a different location within the workspace, use arrow keys. To move between the chip bank and the workspace, use the tab key. After reaching the desired location, press the space key to select a chip or to drop a chip."
Interaction 4
- Action: Press the spacebar to drop a chip.
- Result: The selected chip falls into row 1, column 1. Focus remains on row 1, column 1.
- Screen Reader: "A positive chip is now in the following location in the workspace: row 1, column 1. No chips are selected. The workspace has 1 positive chip and 0 negative chip."
Interaction 5
- Action: Press shift + tab keys to move focus to the chip bank from the workspace.
- Result: Focus moves to the stack of positive chips.
- Screen Reader: "You have reached following location in the chip bank: the stack of positive chips. To move to a different location within the chip bank, use arrow keys. To move between the chip bank and the workspace, use the tab key. After reaching the desired location, press the space key to select a chip or to drop a chip."

Interaction 6
- Action: Press the right arrow key to move focus to the stack of negative chips.
- Result: Focus moves to the stack of negative chips.
- Screen Reader: "You have reached the following location in the chip bank: the stack of negative chips."
Interaction 7
- Action: Press the space bar.
- Result: A negative chip is picked up.
- Screen Reader: "A negative chip is selected. To move between the chip bank and the workspace, use the tab key. After reaching the desired location, press the space key to select a chip or to drop a chip."
Interaction 8
- Action: Tab to move the chip to the work space.
- Result: Both the focus and the chip move to row 1, column 1 of the workspace.
- Screen Reader: "The workspace has 1 positive chip and 0 negative chip. You have reached the following location in the workspace: row 1, column 1. This location has a positive chip. To move to a different location within the workspace, use arrow keys. To move between the chip bank and the workspace, use the tab key. After reaching the desired location, press the space key to select a chip or to drop a chip."
Interaction 9
- Action: Press the space bar.
- Result: The negative chip cancel withe the existing positive chip.
- Screen Reader: "A positive chip and a negative chip have canceled each other. The following location in the workspace is now empty: row 1, column 1. No chips are selected. The workspace has 0 positive chip 0 negative chip."
Looking back...
Visual is just the tip of the accessibility iceberg.
This project immersed me in the complex world of accessible design. Previously, I view software accessibility as simply ensuring the success delivery of visual information. Now, I understand I'm responsible of making information consumable for every user, regardless of their unique circumstances. Some only reply on keyboard to navigate, others zoom their screens up to 400%, while some uses screen readers, I must account for all these scenarios during the design process.
Admittedly, my initial approach often centers on sighted users. This project highlighted that tendency. Even though accessibility was factored in many design decisions, it was often addressed after all other considerations. Accessibility was compromised because the team's prioritization is to ensure a good experience for sighted users. This makes accessibility feels like an afterthought. Could the process begin by designing primarily for those reliant on assistive technologies, followed by considerations for sighted users? Would this lead me to create better designs for everyone? I'm inclined to explore this approach in future projects.